By: Team W12-2 Since: Aug 2018 Licence: MIT
1. Setting up
1.1. Prerequisites
-
JDK
9or laterJDK 10on Windows will fail to run tests in headless mode due to a JavaFX bug. Windows developers are highly recommended to use JDK9. -
IntelliJ IDE
IntelliJ by default has Gradle and JavaFx plugins installed.
Do not disable them. If you have disabled them, go toFile>Settings>Pluginsto re-enable them.
1.2. Setting up the project in your computer
-
Fork this repo, and clone the fork to your computer
-
Open IntelliJ (if you are not in the welcome screen, click
File>Close Projectto close the existing project dialog first) -
Set up the correct JDK version for Gradle
-
Click
Configure>Project Defaults>Project Structure -
Click
New…and find the directory of the JDK
-
-
Click
Import Project -
Locate the
build.gradlefile and select it. ClickOK -
Click
Open as Project -
Click
OKto accept the default settings -
Open a console and run the command
gradlew processResources(Mac/Linux:./gradlew processResources). It should finish with theBUILD SUCCESSFULmessage.
This will generate all resources required by the application and tests.
1.3. Verifying the setup
-
Run the
seedu.address.MainAppand try a few commands -
Run the tests to ensure they all pass.
1.4. Configurations to do before writing code
1.4.1. Configuring the coding style
This project follows oss-generic coding standards. IntelliJ’s default style is mostly compliant with ours but it uses a different import order from ours. To rectify,
-
Go to
File>Settings…(Windows/Linux), orIntelliJ IDEA>Preferences…(macOS) -
Select
Editor>Code Style>Java -
Click on the
Importstab to set the order-
For
Class count to use import with '*'andNames count to use static import with '*': Set to999to prevent IntelliJ from contracting the import statements -
For
Import Layout: The order isimport static all other imports,import java.*,import javax.*,import org.*,import com.*,import all other imports. Add a<blank line>between eachimport
-
Optionally, you can follow the UsingCheckstyle.adoc document to configure Intellij to check style-compliance as you write code.
1.4.2. Updating documentation to match your fork
After forking the repo, the documentation will still have the SE-EDU branding and refer to the se-edu/addressbook-level4 repo.
If you plan to develop this fork as a separate product (i.e. instead of contributing to se-edu/addressbook-level4), you should do the following:
-
Configure the site-wide documentation settings in
build.gradle, such as thesite-name, to suit your own project. -
Replace the URL in the attribute
repoURLinDeveloperGuide.adocandUserGuide.adocwith the URL of your fork.
1.4.3. Setting up CI
Set up Travis to perform Continuous Integration (CI) for your fork. See UsingTravis.adoc to learn how to set it up.
After setting up Travis, you can optionally set up coverage reporting for your team fork (see UsingCoveralls.adoc).
| Coverage reporting could be useful for a team repository that hosts the final version but it is not that useful for your personal fork. |
Optionally, you can set up AppVeyor as a second CI (see UsingAppVeyor.adoc).
| Having both Travis and AppVeyor ensures your App works on both Unix-based platforms and Windows-based platforms (Travis is Unix-based and AppVeyor is Windows-based) |
1.4.4. Getting started with coding
When you are ready to start coding,
-
Get some sense of the overall design by reading Section 2.1, “Architecture”.
-
Take a look at Appendix A, Product Scope.
2. Design
2.1. Architecture
Architecture Diagram

The Architecture Diagram given above explains the high-level design of the App. Given below is a quick overview of each component.
The .pptx files used to create diagrams in this document can be found in the diagrams folder. To update a diagram, modify the diagram in the pptx file, select the objects of the diagram, and choose Save as picture.
|
Main has only one class called MainApp. It is responsible for,
-
At app launch: Initializes the components in the correct sequence, and connects them up with each other.
-
At shut down: Shuts down the components and invokes cleanup method where necessary.
Commons represents a collection of classes used by multiple other components. Two of those classes play important roles at the architecture level.
-
EventsCenter: This class (written using Google’s Event Bus library) is used by components to communicate with other components using events (i.e. a form of Event Driven design) -
LogsCenter: Used by many classes to write log messages to the App’s log file.
The rest of the App consists of four components.
Each of the four components
-
Defines its API in an
interfacewith the same name as the Component. -
Exposes its functionality using a
{Component Name}Managerclass.
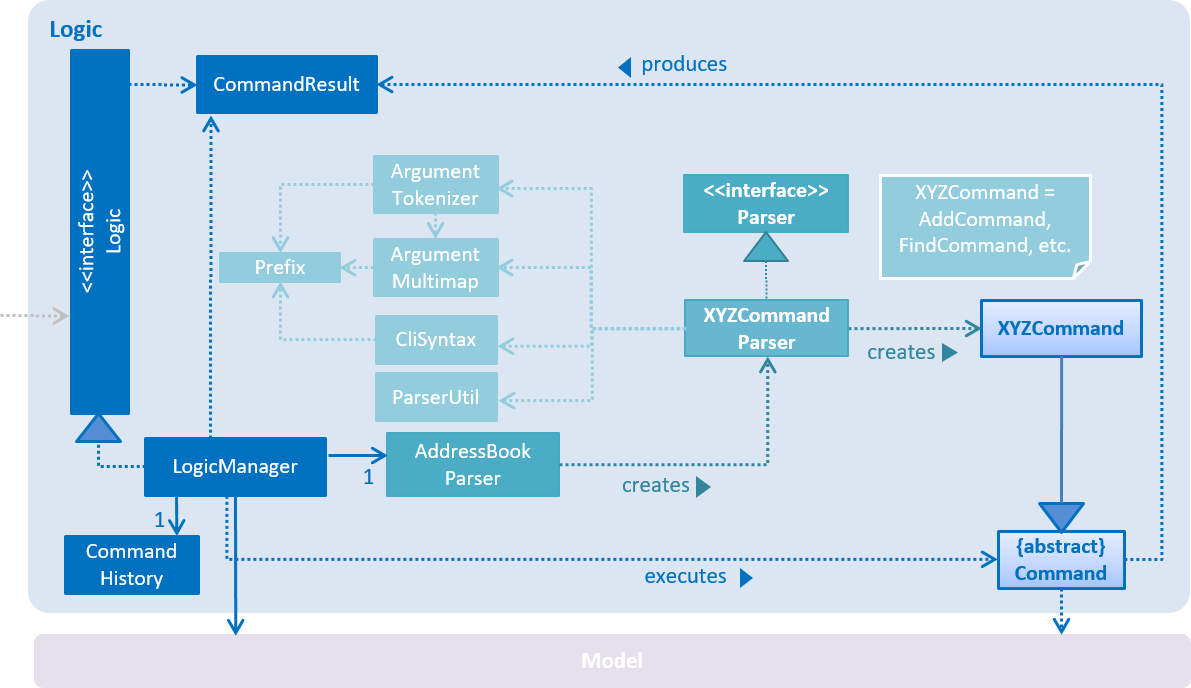
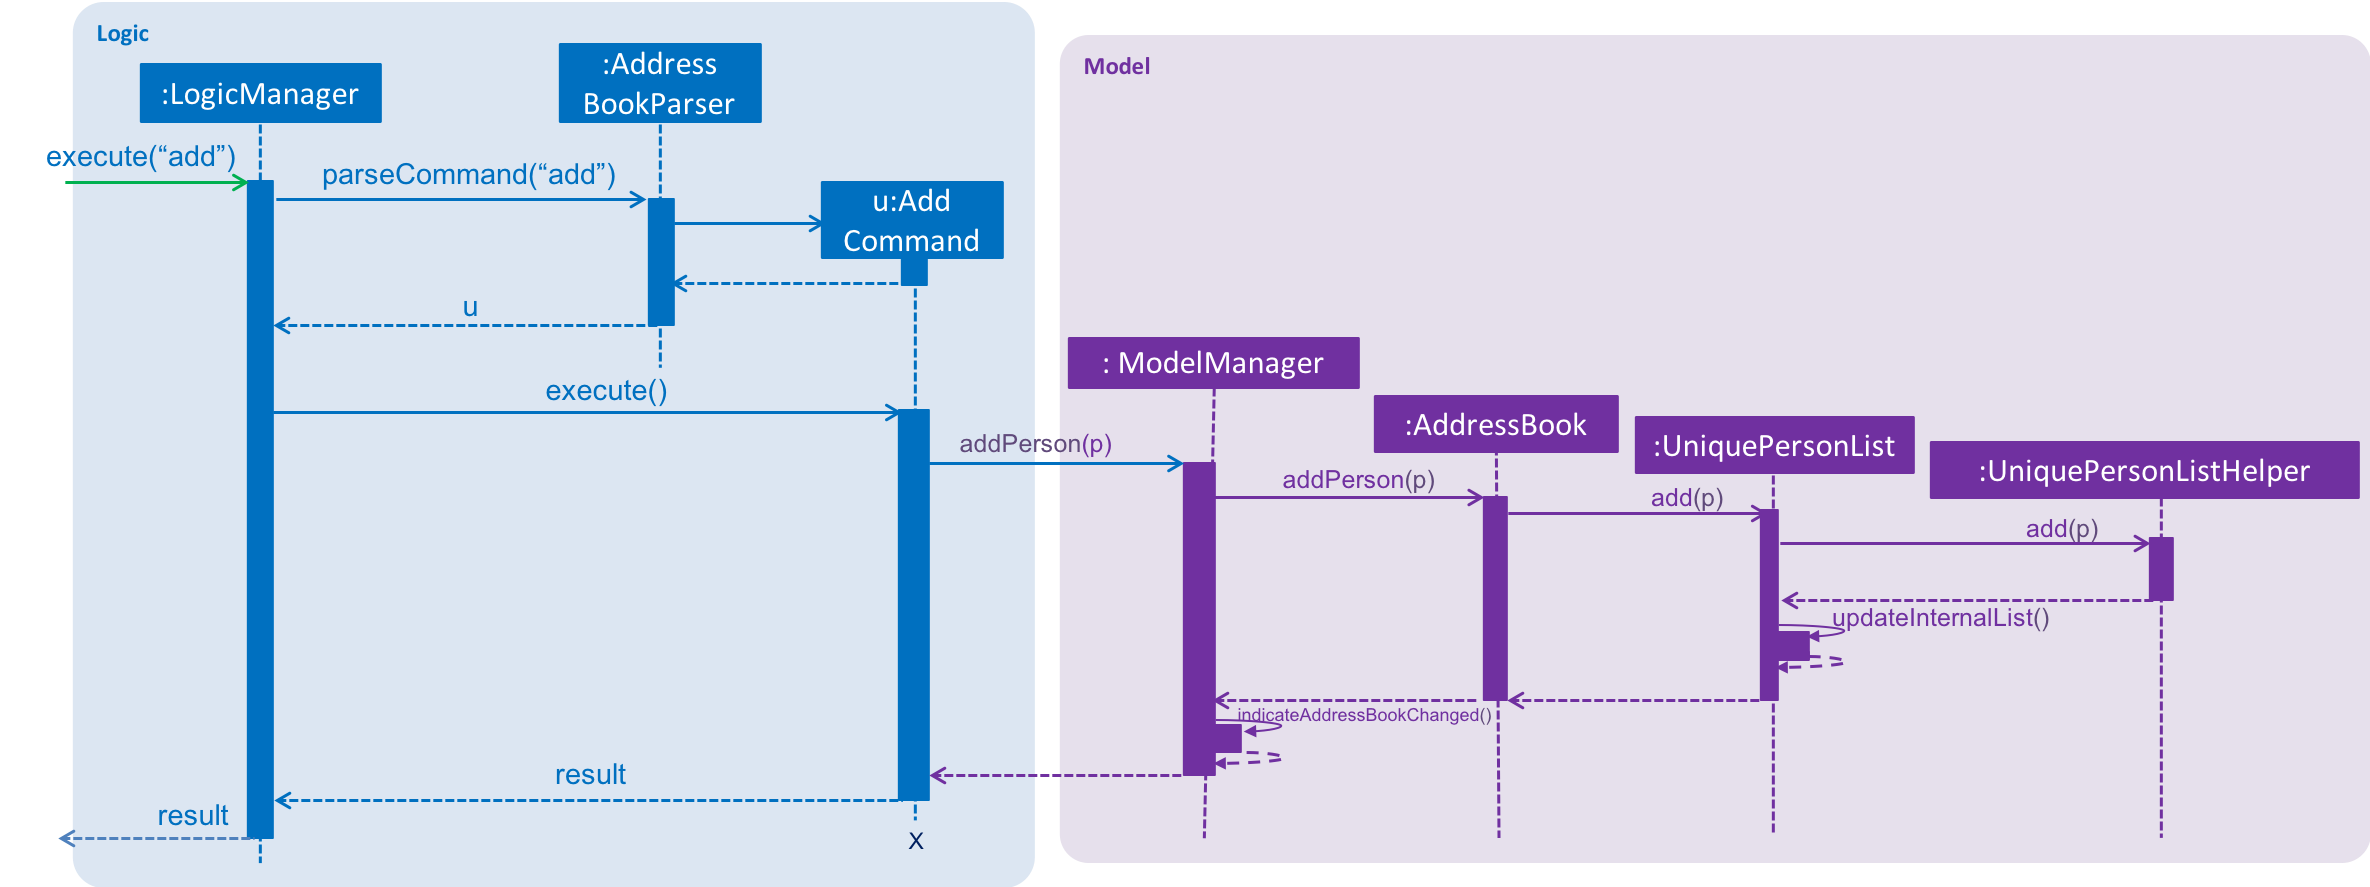
For example, the Logic component (see the class diagram given below) defines it’s API in the Logic.java interface and exposes its functionality using the LogicManager.java class.
Class Diagram of the Logic Component
Events-Driven nature of the design
The Sequence Diagram below shows how the components interact for the scenario where the user issues the command delete 1.
Component interactions for delete 1 command (part 1)
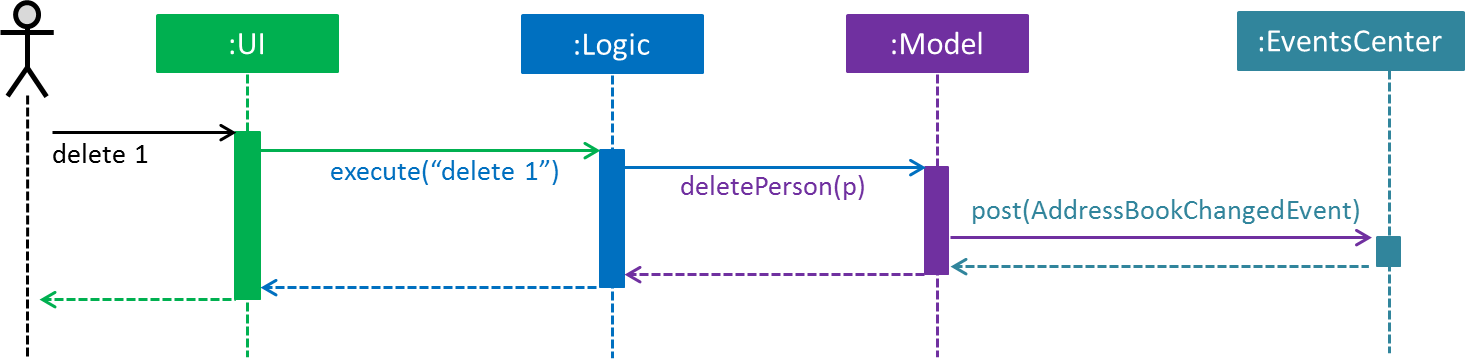
Note how the Model simply raises a AddressBookChangedEvent when the Address Book data are changed, instead of asking the Storage to save the updates to the hard disk.
|
The diagram below shows how the EventsCenter reacts to that event, which eventually results in the updates being saved to the hard disk and the status bar of the UI being updated to reflect the 'Last Updated' time.
Component interactions for delete 1 command (part 2)
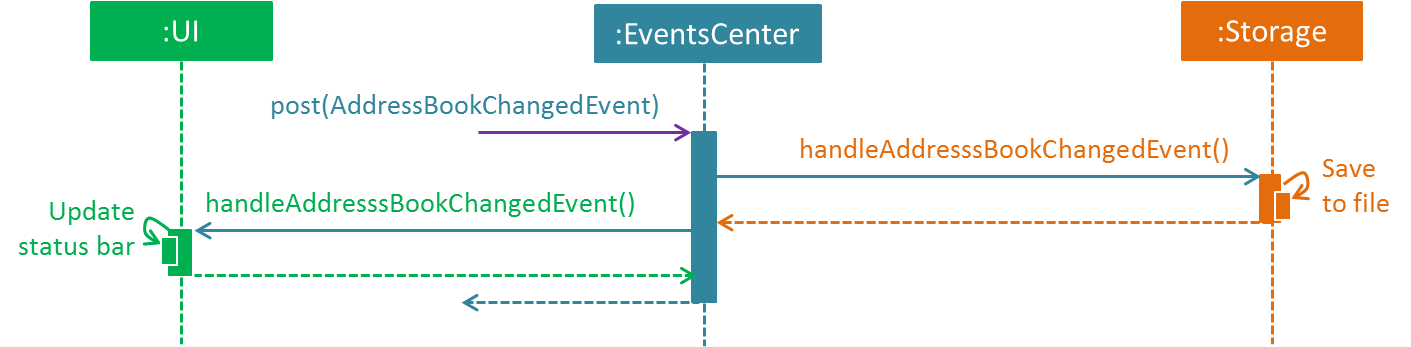
Note how the event is propagated through the EventsCenter to the Storage and UI without Model having to be coupled to either of them. This is an example of how this Event Driven approach helps us reduce direct coupling between components.
|
The sections below give more details of each component.
2.2. UI component
Structure of the UI Component
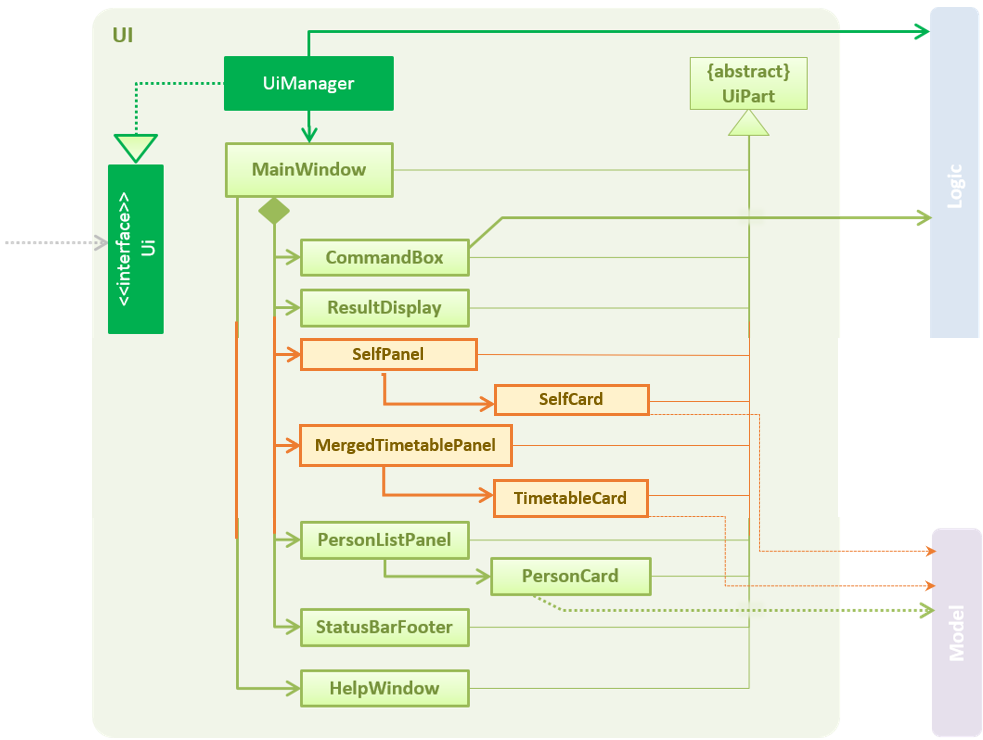
API : Ui.java
The UI consists of a MainWindow that is made up of parts e.g.CommandBox, ResultDisplay, PersonListPanel,
StatusBarFooter, MergedTimetablePanel etc. All these, including the MainWindow, inherit from the abstract
UiPart class.
The UI component uses JavaFx UI framework. The layout of these UI parts are defined in matching .fxml files that are in the src/main/resources/view folder. For example, the layout of the MainWindow is specified in MainWindow.fxml
The UI component,
-
Executes user commands using the
Logiccomponent. -
Binds itself to some data in the
Modelso that the UI can auto-update when data in theModelchange. -
Responds to events raised from various parts of the App and updates the UI accordingly.
2.3. Logic component
Structure of the Logic Component
API :
Logic.java
-
Logicuses theAddressBookParserclass to parse the user command. -
This results in a
Commandobject which is executed by theLogicManager. -
The command execution can affect the
Model(e.g. adding a person) and/or raise events. -
The result of the command execution is encapsulated as a
CommandResultobject which is passed back to theUi.
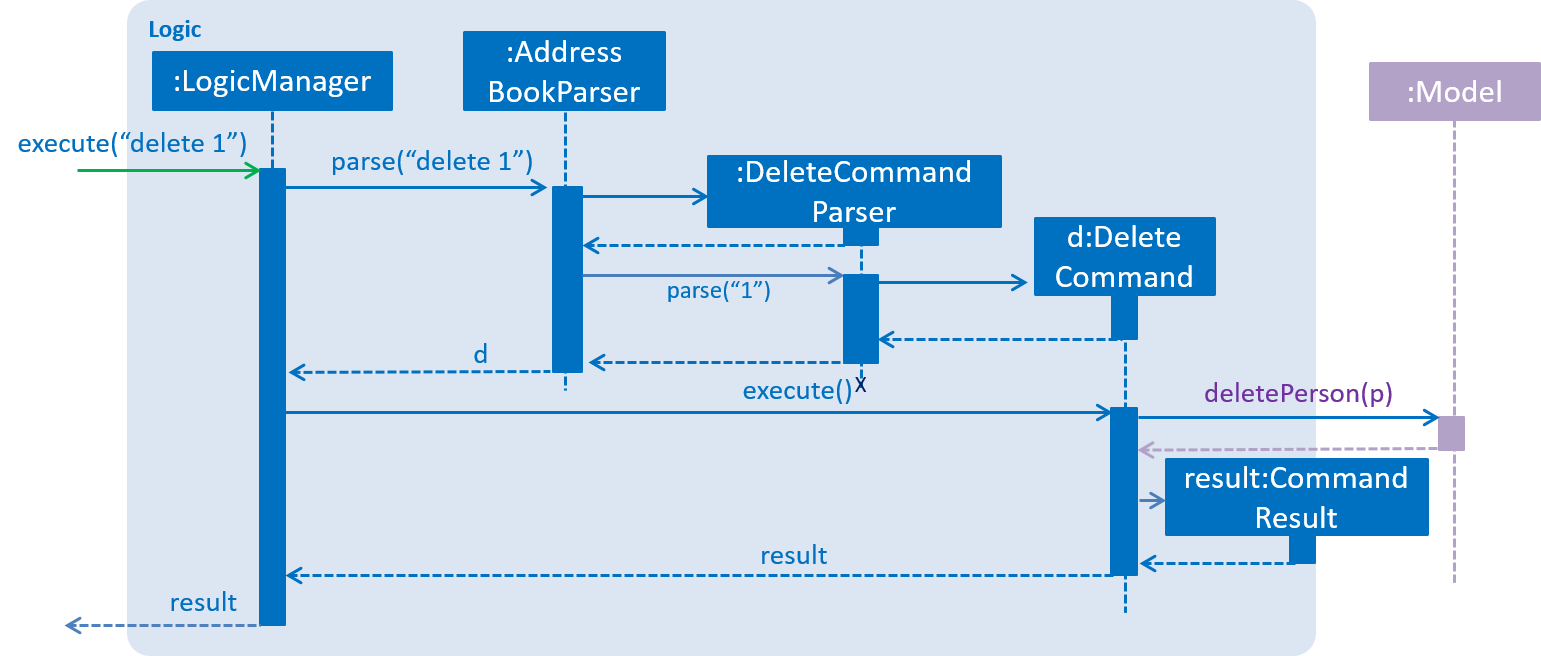
Given below is the Sequence Diagram for interactions within the Logic component for the execute("delete 1") API call.
Interactions Inside the Logic Component for the delete 1 Command
2.4. Model component
Structure of the Model Component
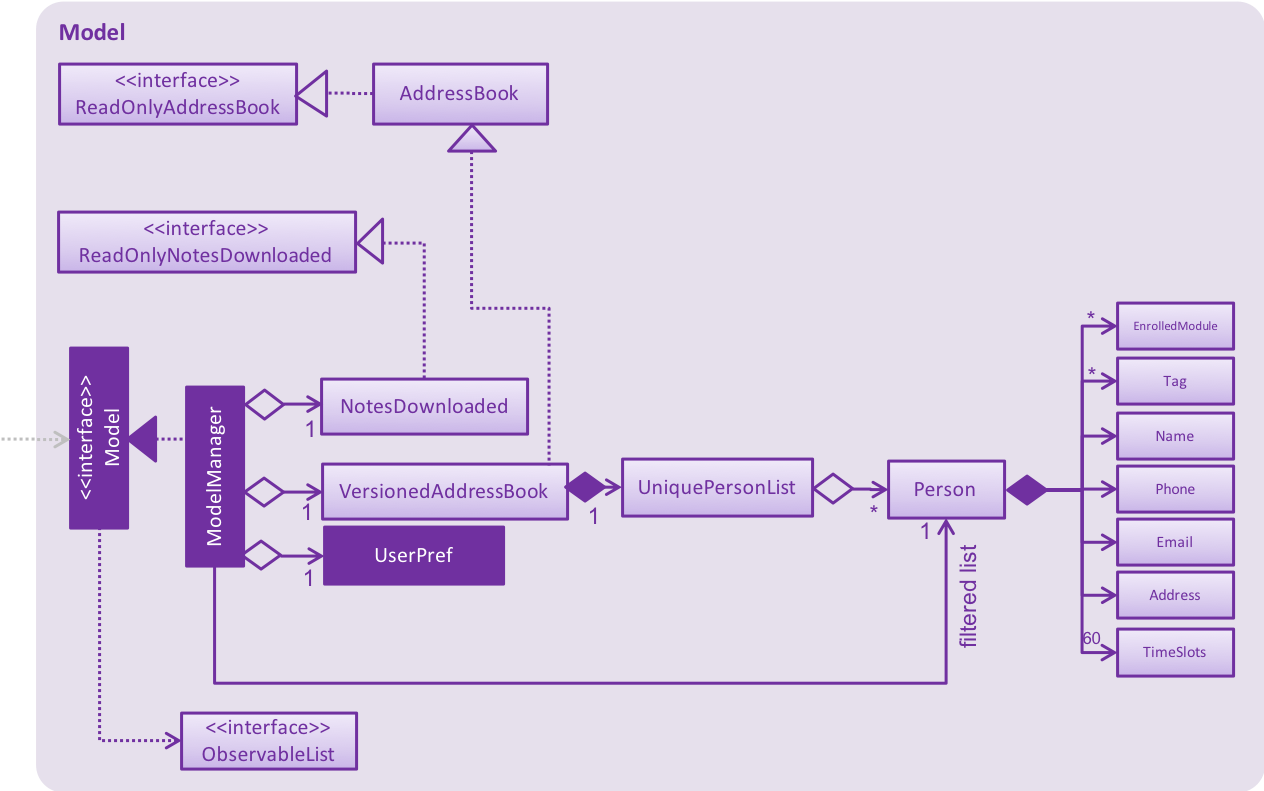
API : Model.java
The Model,
-
stores a
UserPrefobject that represents the user’s preferences. -
stores the Address Book data.
-
exposes an unmodifiable
ObservableList<Person>that can be 'observed' e.g. the UI can be bound to this list so that the UI automatically updates when the data in the list changes. -
exposes an unmodifiable
ReadOnlyNotesDownloaded<Set>that can be 'observed' e.g. the Logic can be bound to this list so that the Logic can detect what notes have been downloaded by the user. -
does not depend on any of the other three components.
As a more OOP model, we can store a Tag list in Address Book, which Person can reference. This would allow Address Book to only require one Tag object per unique Tag, instead of each Person needing their own Tag object. An example of how such a model may look like is given below.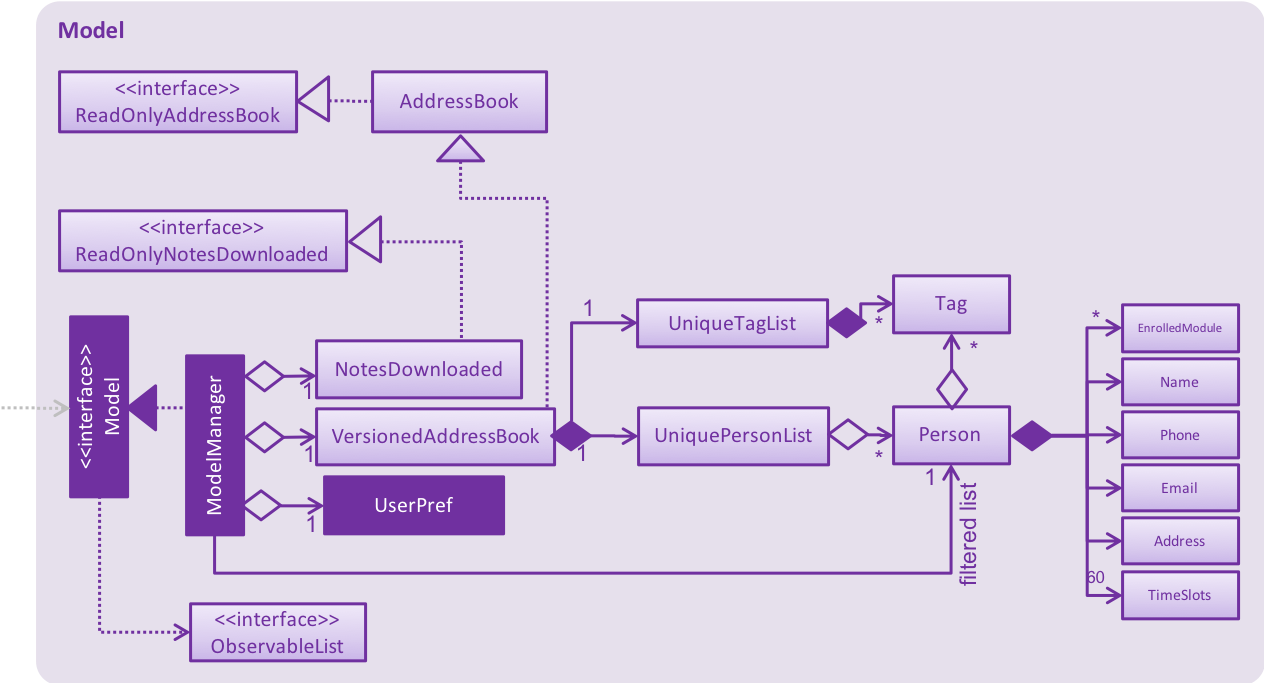 Similarly, we can store a EnrolledModules list in Address Book, which Person can reference. This would allow Address Book to only require one EnrolledModules object per unique EnrolledModules, instead of each Person needing their own EnrolledModules object. An example of how such a model may look like is given below.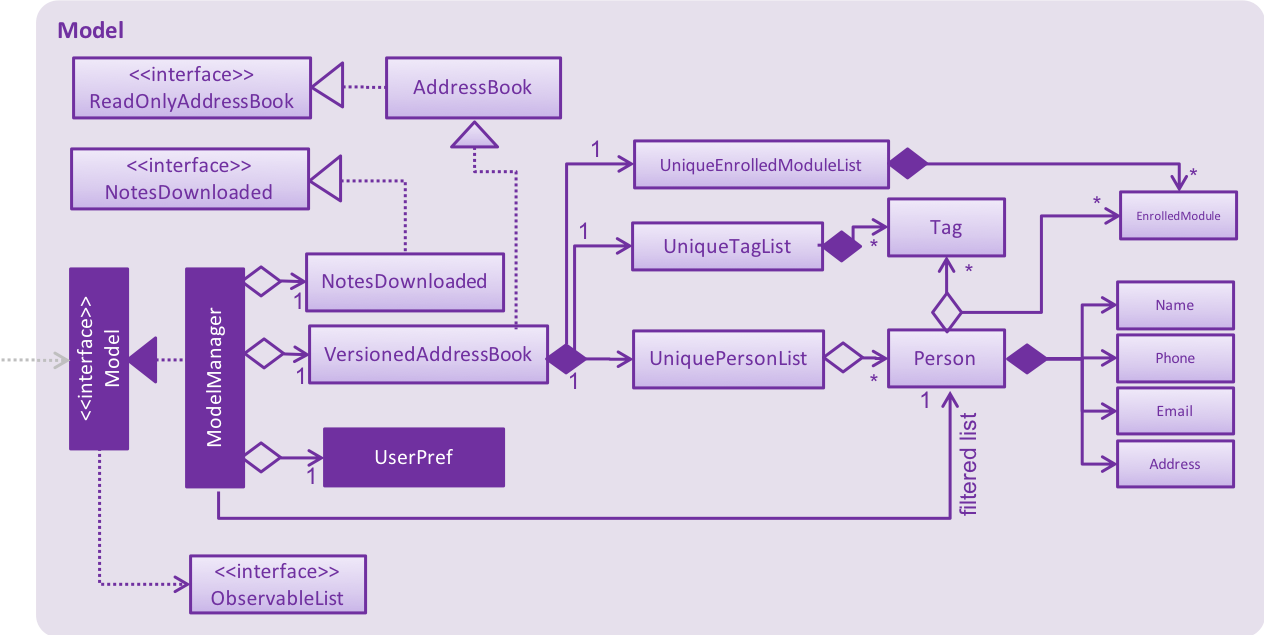
|
2.5. Storage component
Structure of the Storage Component
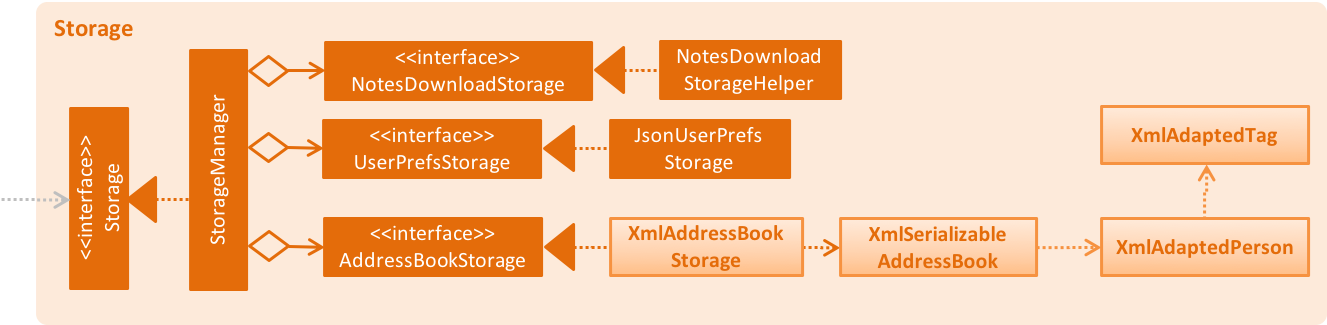
API : Storage.java
The Storage component as shown in the figure above, has the following capabilities.
-
can save
UserPrefobjects in json format and read it back. -
can save the Address Book data in xml format and read it back.
-
can unzip, organize and delete, a ll notes downloaded by the user using NSync.
2.6. Common classes
Classes used by multiple components are in the seedu.addressbook.commons package.
3. Implementation
This section describes some noteworthy details on how certain features are implemented.
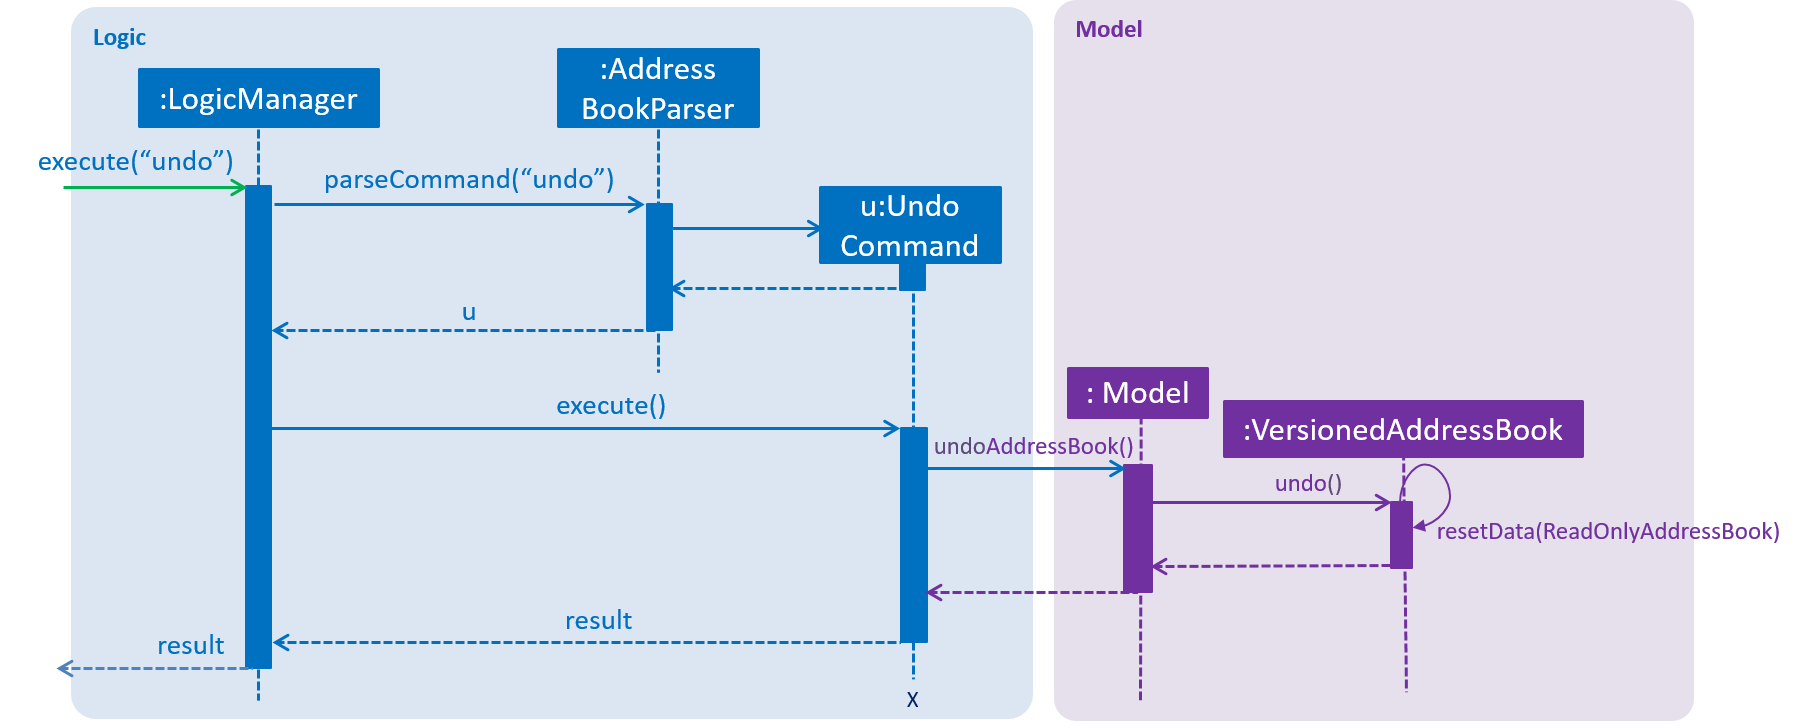
3.1. Undo/Redo feature
3.1.1. Current Implementation
The undo/redo mechanism is facilitated by VersionedAddressBook.
It extends AddressBook with an undo/redo history, stored internally as an addressBookStateList and currentStatePointer.
Additionally, it implements the following operations:
-
VersionedAddressBook#commit()— Saves the current address book state in its history. -
VersionedAddressBook#undo()— Restores the previous address book state from its history. -
VersionedAddressBook#redo()— Restores a previously undone address book state from its history.
These operations are exposed in the Model interface as Model#commitAddressBook(), Model#undoAddressBook() and Model#redoAddressBook() respectively.
Given below is an example usage scenario and how the undo/redo mechanism behaves at each step.
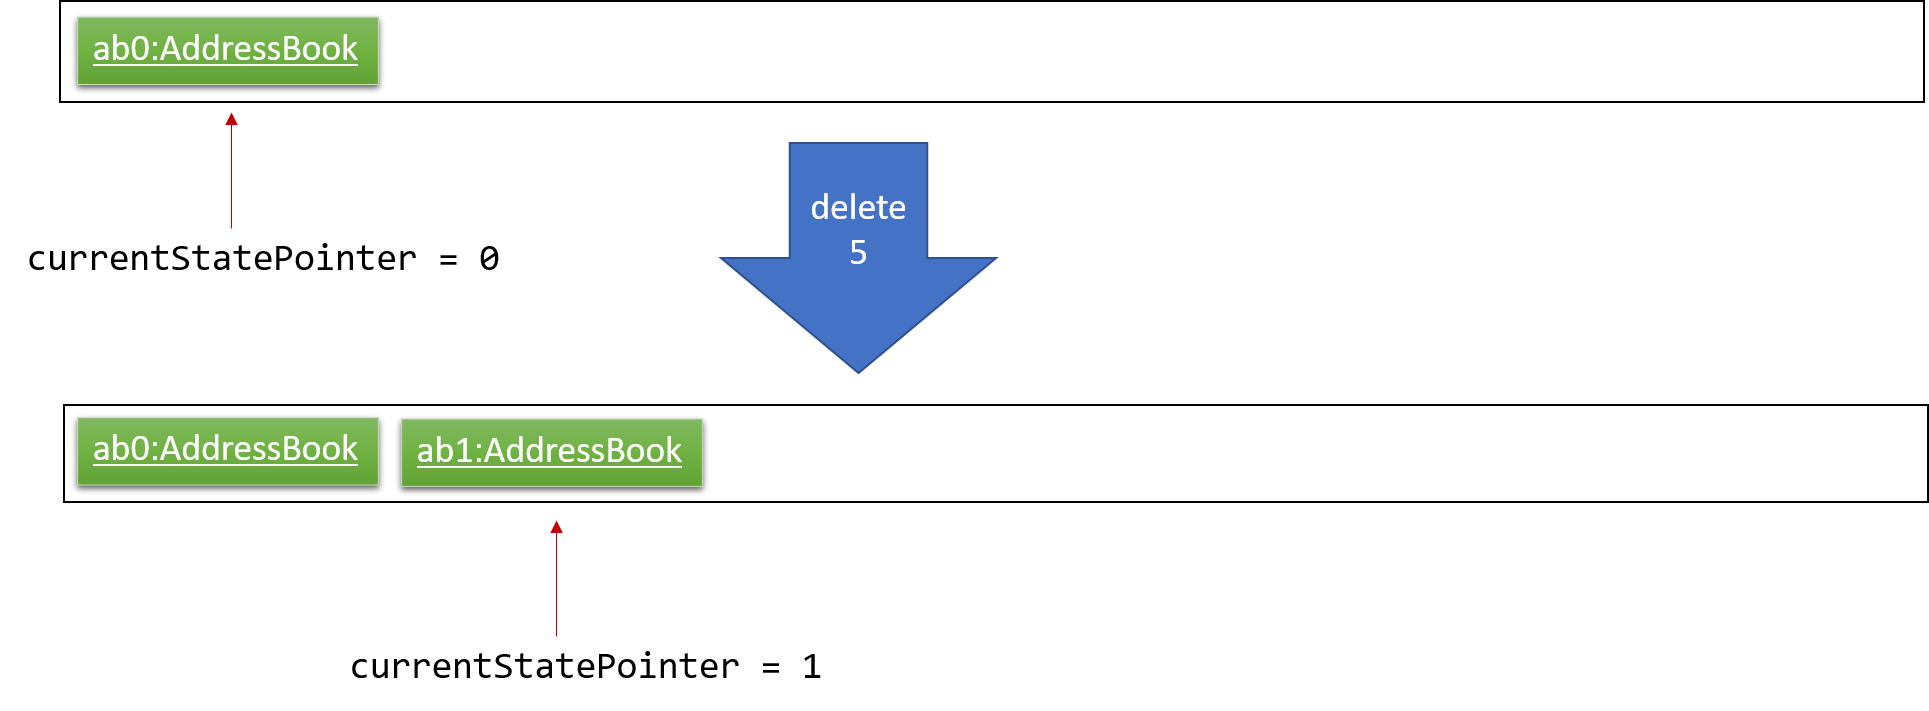
Step 1. The user launches the application for the first time. The VersionedAddressBook will be initialized with the initial address book state, and the currentStatePointer pointing to that single address book state.

Step 2. The user executes delete 5 command to delete the 5th person in the address book. The delete command calls Model#commitAddressBook(), causing the modified state of the address book after the delete 5 command executes to be saved in the addressBookStateList, and the currentStatePointer is shifted to the newly inserted address book state.
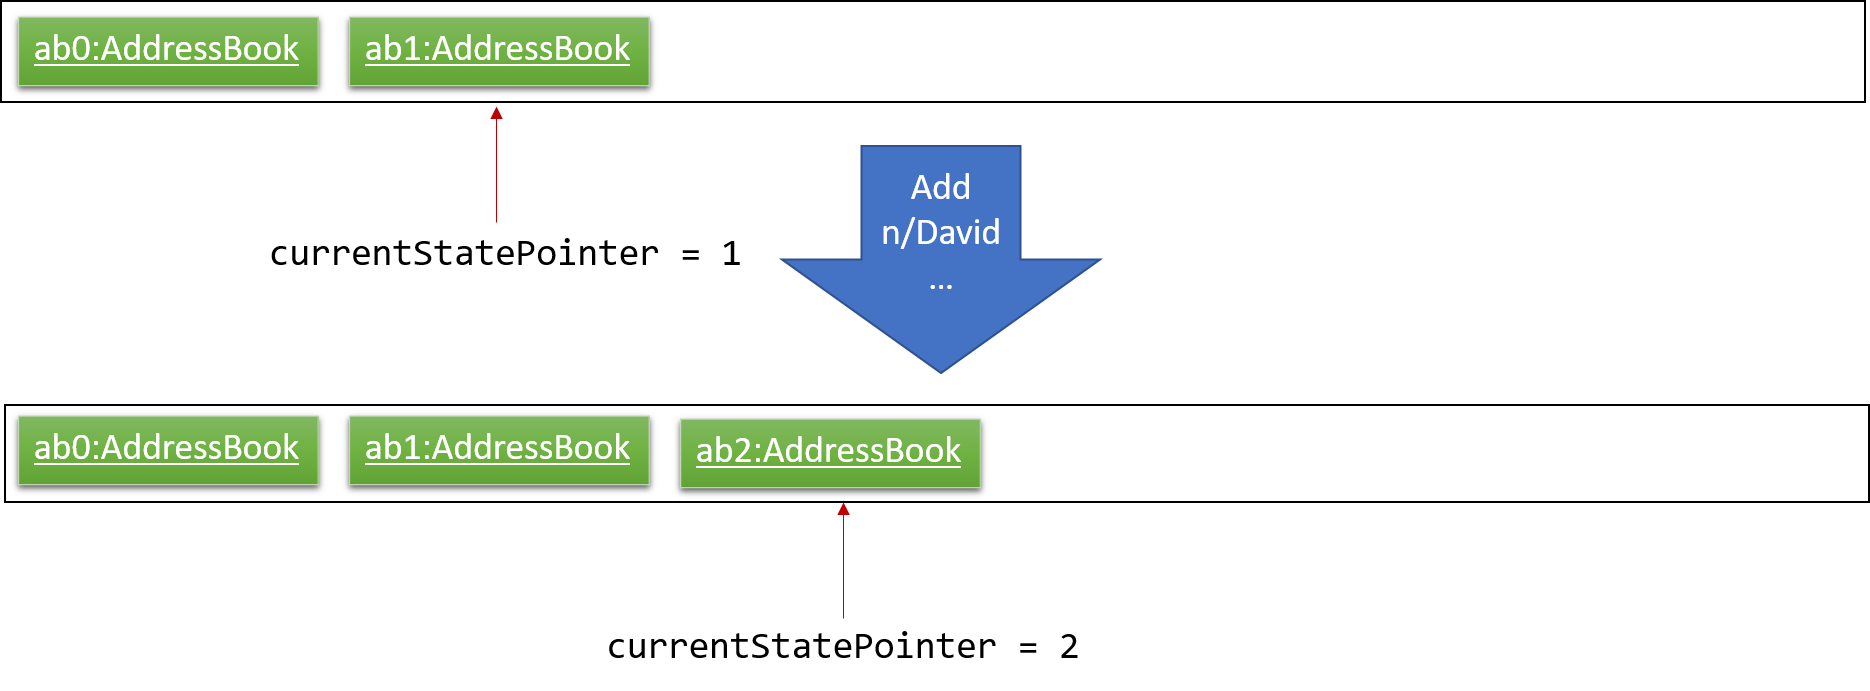
Step 3. The user executes add n/David … to add a new person. The add command also calls Model#commitAddressBook(), causing another modified address book state to be saved into the addressBookStateList.
If a command fails its execution, it will not call Model#commitAddressBook(), so the address book state will not be saved into the addressBookStateList.
|
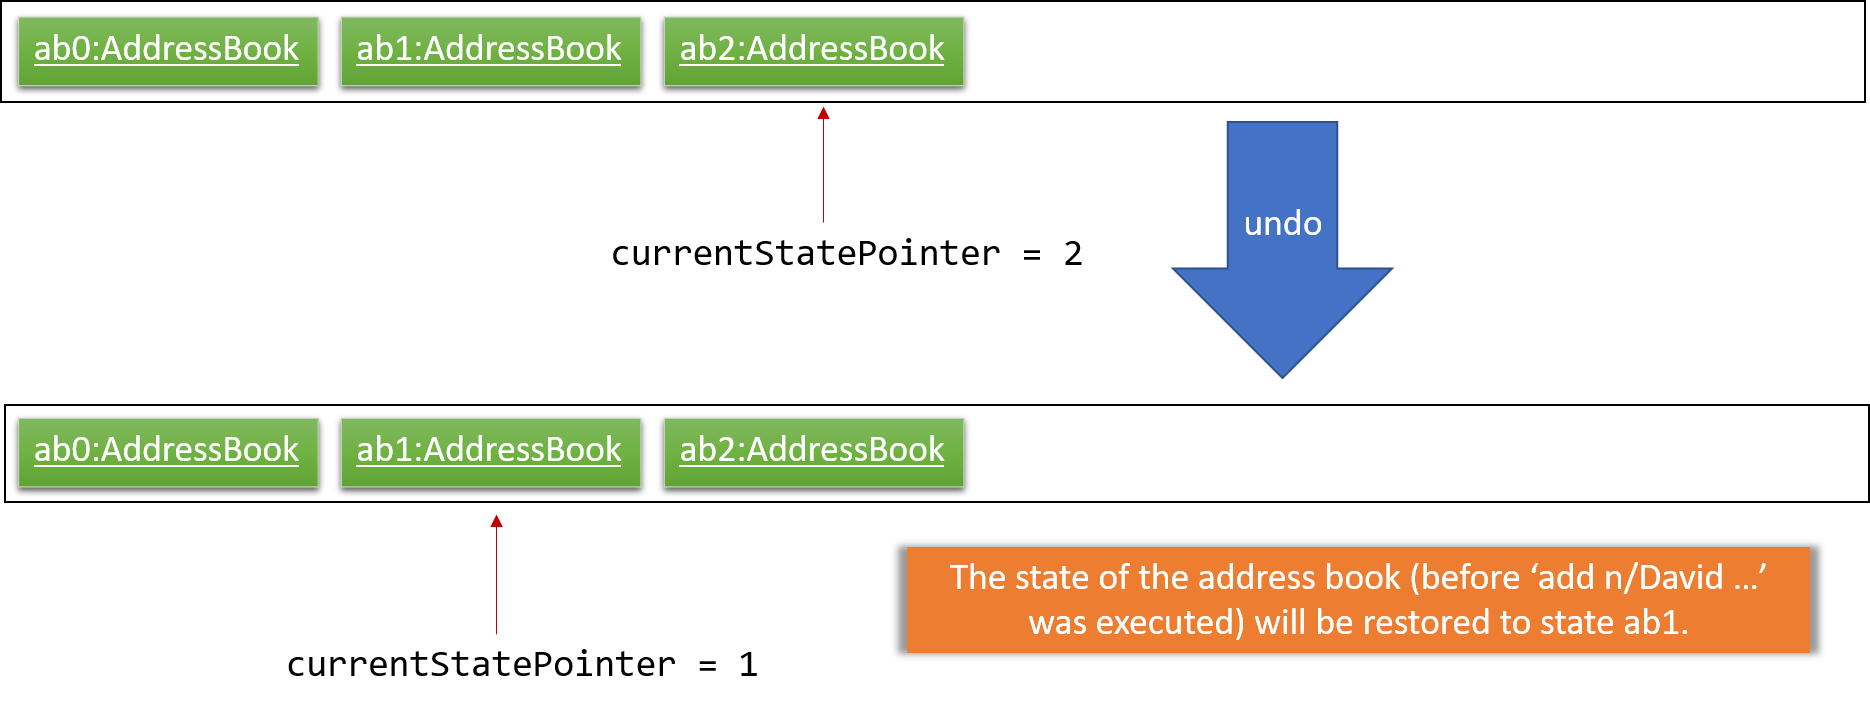
Step 4. The user now decides that adding the person was a mistake, and decides to undo that action by executing the undo command. The undo command will call Model#undoAddressBook(), which will shift the currentStatePointer once to the left, pointing it to the previous address book state, and restores the address book to that state.
If the currentStatePointer is at index 0, pointing to the initial address book state, then there are no previous address book states to restore. The undo command uses Model#canUndoAddressBook() to check if this is the case. If so, it will return an error to the user rather than attempting to perform the undo.
|
The following sequence diagram shows how the undo operation works:
The redo command does the opposite — it calls Model#redoAddressBook(), which shifts the currentStatePointer once to the right, pointing to the previously undone state, and restores the address book to that state.
If the currentStatePointer is at index addressBookStateList.size() - 1, pointing to the latest address book state, then there are no undone address book states to restore. The redo command uses Model#canRedoAddressBook() to check if this is the case. If so, it will return an error to the user rather than attempting to perform the redo.
|
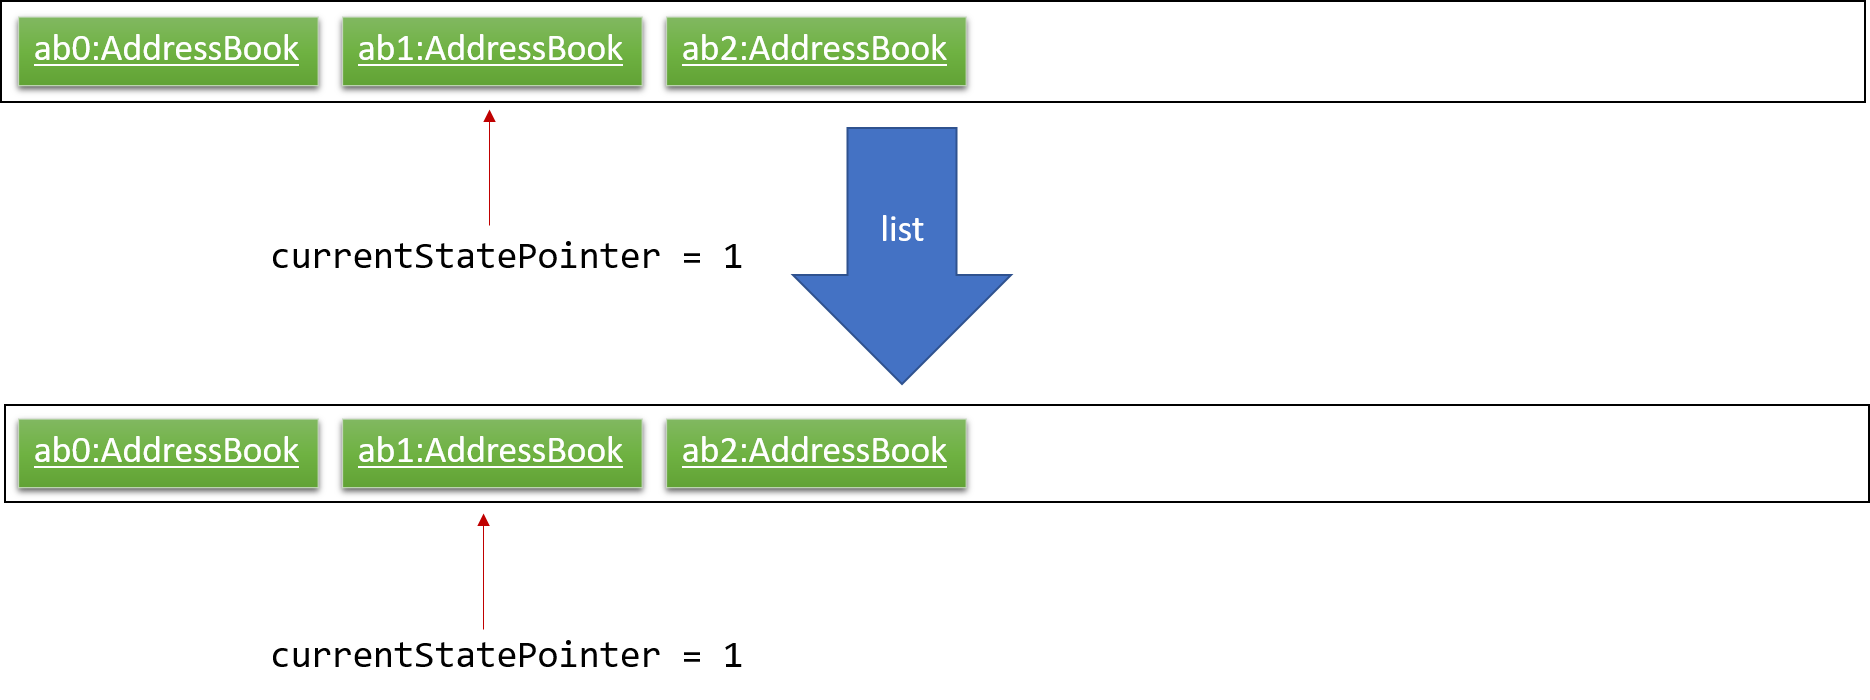
Step 5. The user then decides to execute the command list. Commands that do not modify the address book, such as list, will usually not call Model#commitAddressBook(), Model#undoAddressBook() or Model#redoAddressBook(). Thus, the addressBookStateList remains unchanged.
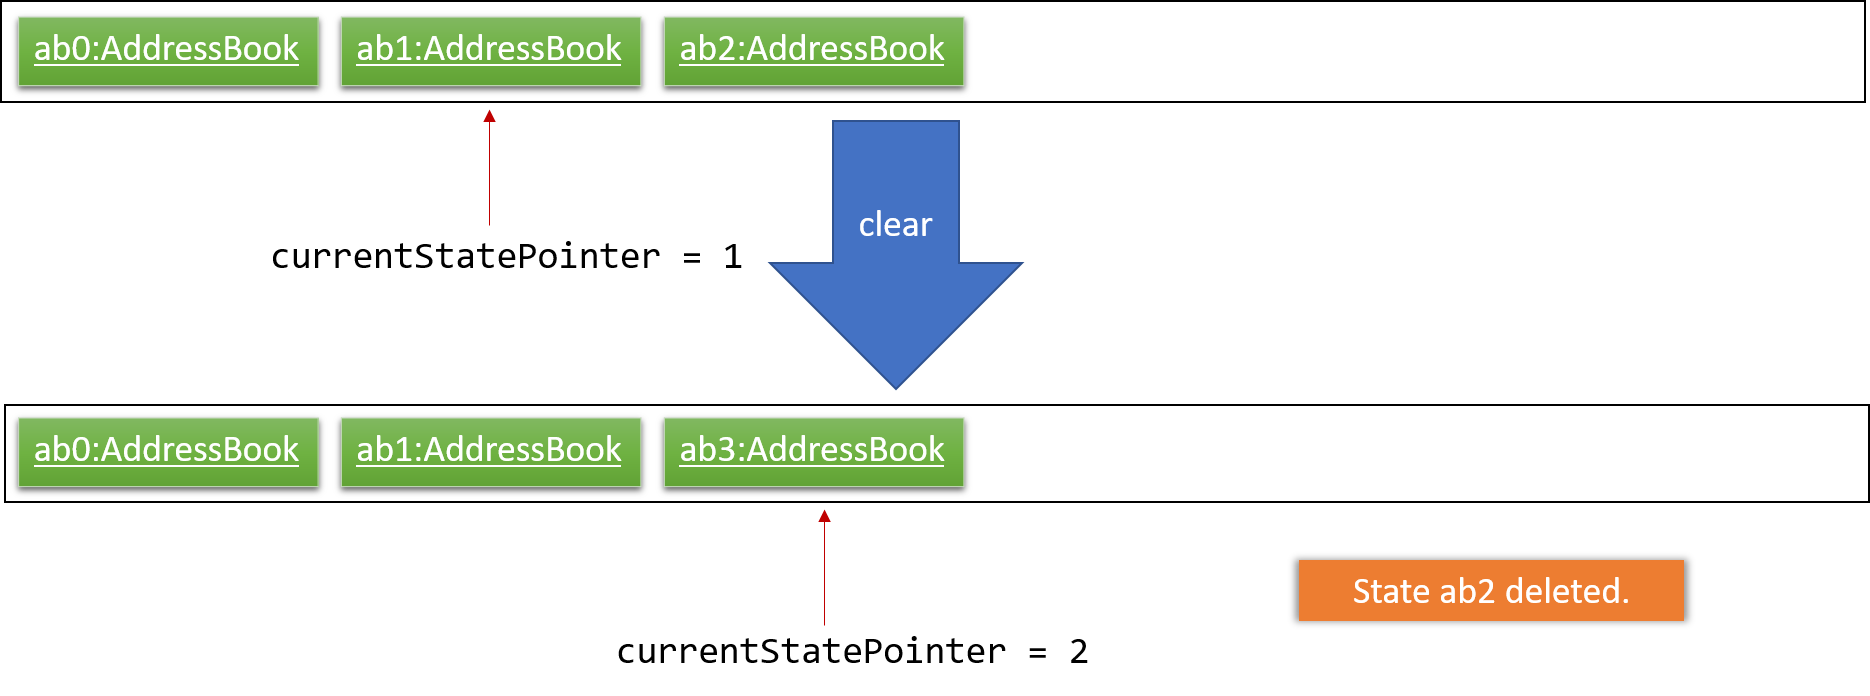
Step 6. The user executes clear, which calls Model#commitAddressBook(). Since the currentStatePointer is not pointing at the end of the addressBookStateList, all address book states after the currentStatePointer will be purged. We designed it this way because it no longer makes sense to redo the add n/David … command. This is the behavior that most modern desktop applications follow.
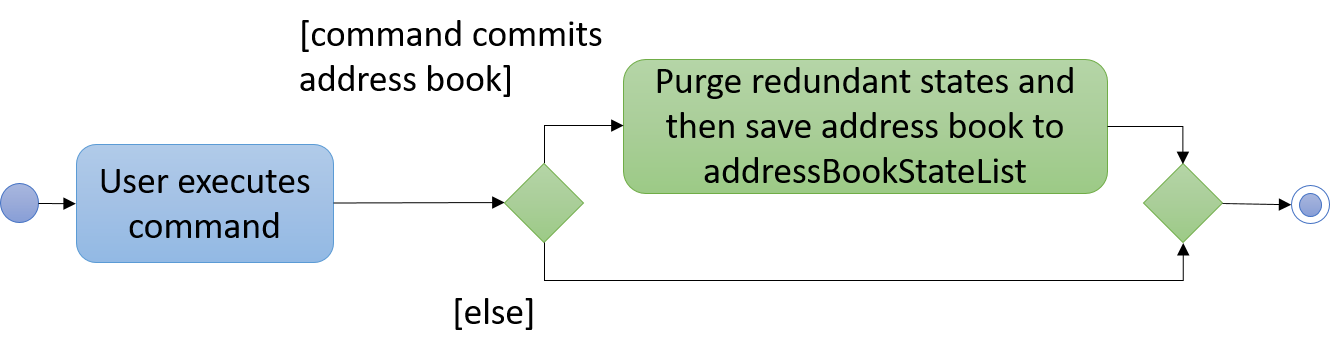
The following activity diagram summarizes what happens when a user executes a new command:
3.1.2. Design Considerations
Aspect: How undo & redo executes
-
Alternative 1 (current choice): Saves the entire address book.
-
Pros: Easy to implement.
-
Cons: May have performance issues in terms of memory usage.
-
-
Alternative 2: Individual command knows how to undo/redo by itself.
-
Pros: Will use less memory (e.g. for
delete, just save the person being deleted). -
Cons: We must ensure that the implementation of each individual command are correct.
-
Aspect: Data structure to support the undo/redo commands
-
Alternative 1 (current choice): Use a list to store the history of address book states.
-
Pros: Easy for new Computer Science student undergraduates to understand, who are likely to be the new incoming developers of our project.
-
Cons: Logic is duplicated twice. For example, when a new command is executed, we must remember to update both
HistoryManagerandVersionedAddressBook.
-
-
Alternative 2: Use
HistoryManagerfor undo/redo-
Pros: We do not need to maintain a separate list, and just reuse what is already in the codebase.
-
Cons: Requires dealing with commands that have already been undone: We must remember to skip these commands. Violates Single Responsibility Principle and Separation of Concerns as
HistoryManagernow needs to do two different things.
-
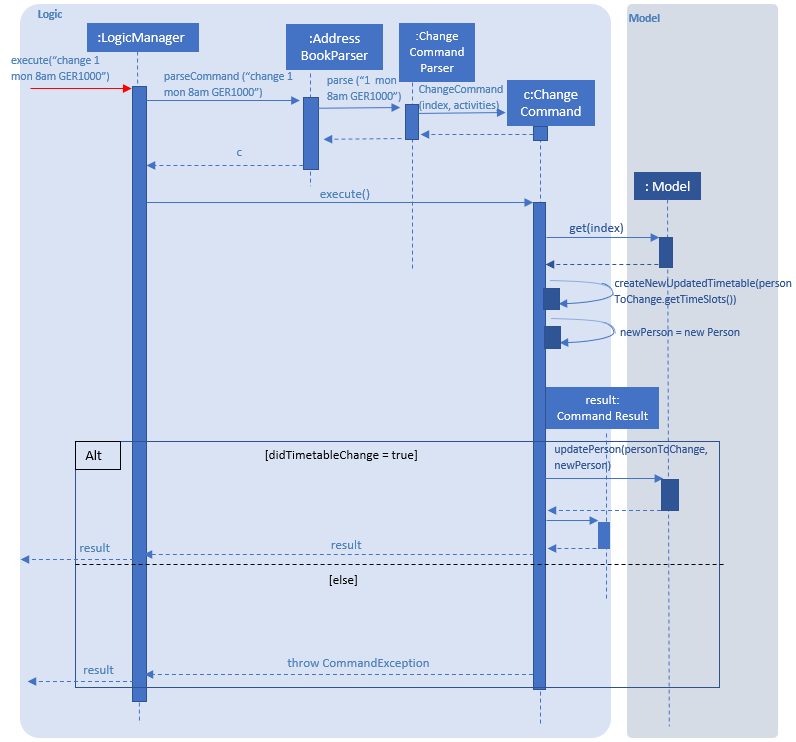
3.2. Change Time Slot Feature
3.2.1. Current Implementation
The change time slot feature allows users to edit the timetables of the contacts in their address book. The user inputs the index of the contact whose timetable they would like to edit, the day and time of the time slot they want to edit, and the activity they would like to put in that time slot.
Given below is an example a usage scenario and how the change mechanism behaves at each step.
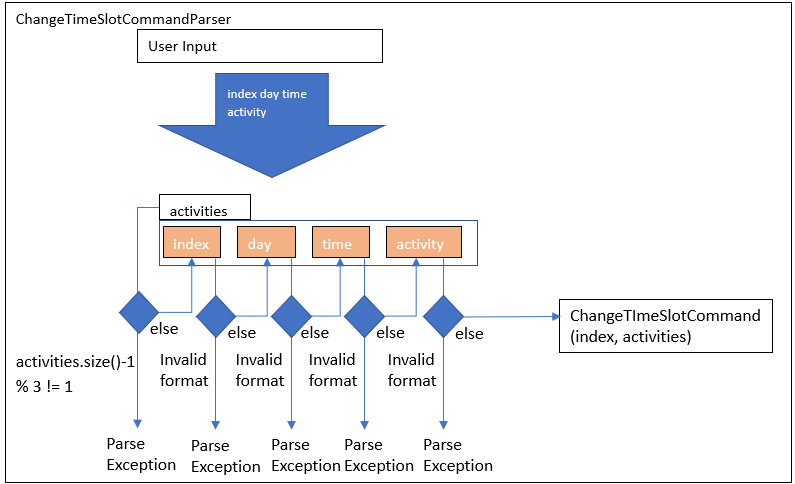
Step 1. The user inputs the index, day, time and activity. The ChangeTimeSlotCommandParser puts them into an array
activities and checks to ensure that all the inputs are present and the inputs are in the correct format. Any
incorrectly formatted input will result in a ParseException being thrown. It then calls the ChangeTimeSlotCommand
with the first element of activities as the index and activities as arguments.
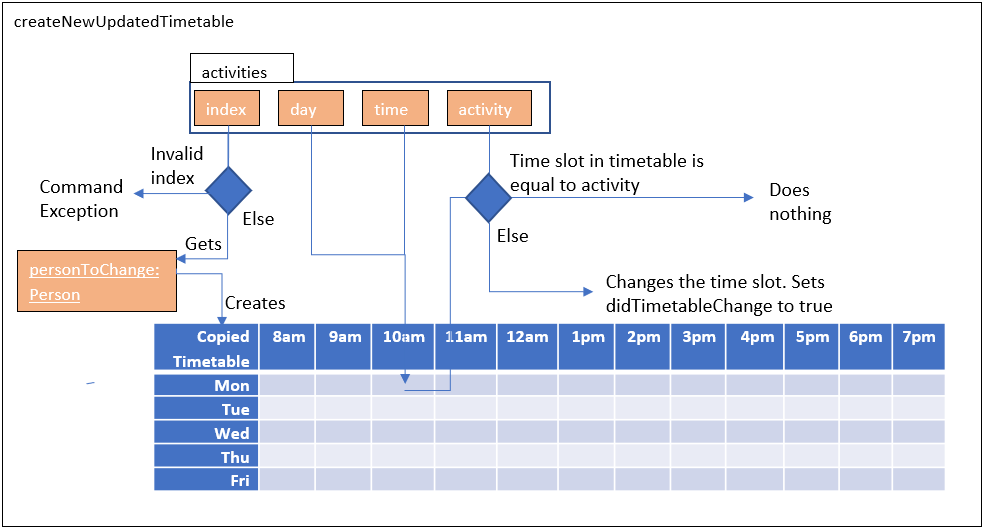
Step 2. The ChangeTimeSlotCommand uses the index to get the Person, personToChange whose timetable is supposed to
be changed. It then calls createNewUpdatedTimetable with the timetable of personToChange copy of their timetable is
made. This method iterates through activities and gets the day time and
activity by checking their position in the array. The time slot to be changed is retrieved based on the selected Person, day and time.
It then checks to see if the activity at the selected time slot is the same as the one it is supposed to be changed to. If it is, it is
ignored. If it is not, the time slot in the copied timetable is changed and a Boolean variable didTimetableChange is
set to true.
Step 3. Once activities has been fully iterated through, a new Person newPerson is created with all the same
identity fields of personToChange, except for the timetable which is the changed timetable.
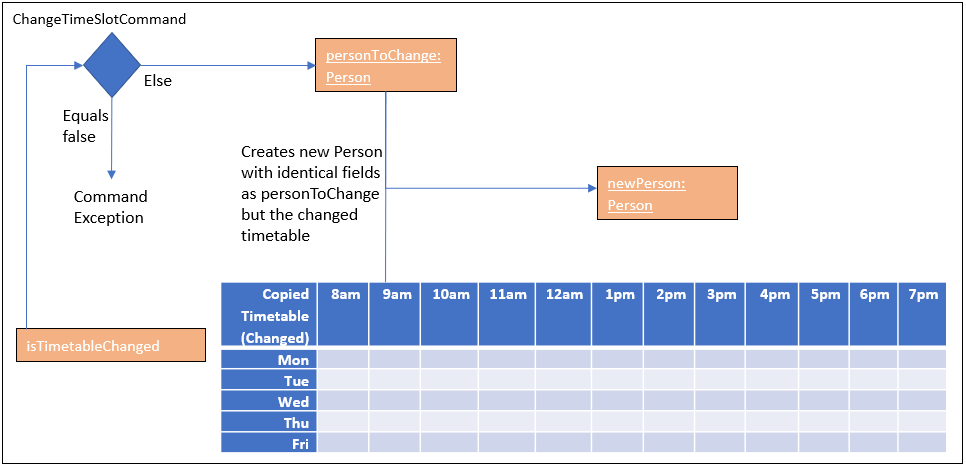
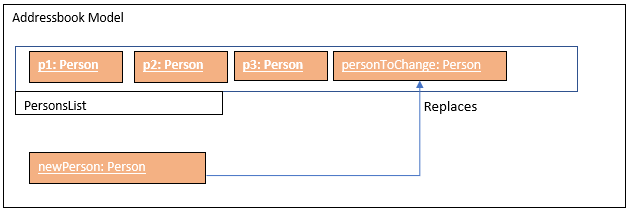
Step 4. newPerson replaces personToChange in the AddressBook.
The following sequence diagram shows how the change function works.
3.2.2. Design Considerations
Aspect: How change executes
-
Alternative 1 (current choice): Create a copy of the timetable to change and then create a new
Personwith the same identity fields as thepersonto change with the changed timetable and replacing thepersonto change with this newPerson.-
Pros: Prevents a bugs caused by user inputting the same change to a time slot twice in the same input which results in the application stating that no time slot was changed even though a time slot is changed.
-
Cons: Takes more processes making it a little slower.
-
-
Alternative 2 : Directly change the timetable of the
personto change.-
Pros: Takes less processes making it a little faster.
-
Cons: Might result in aforementioned bug.
-
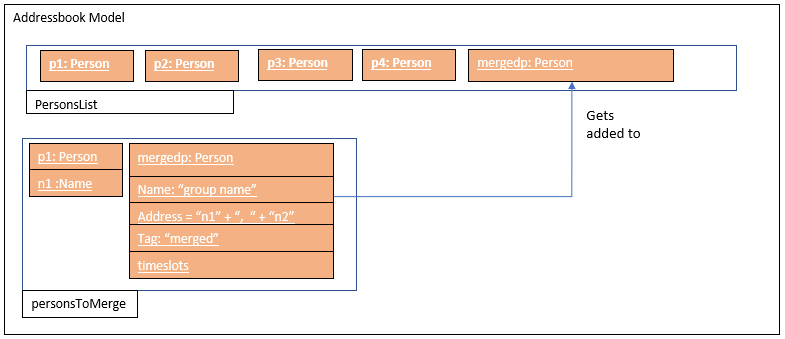
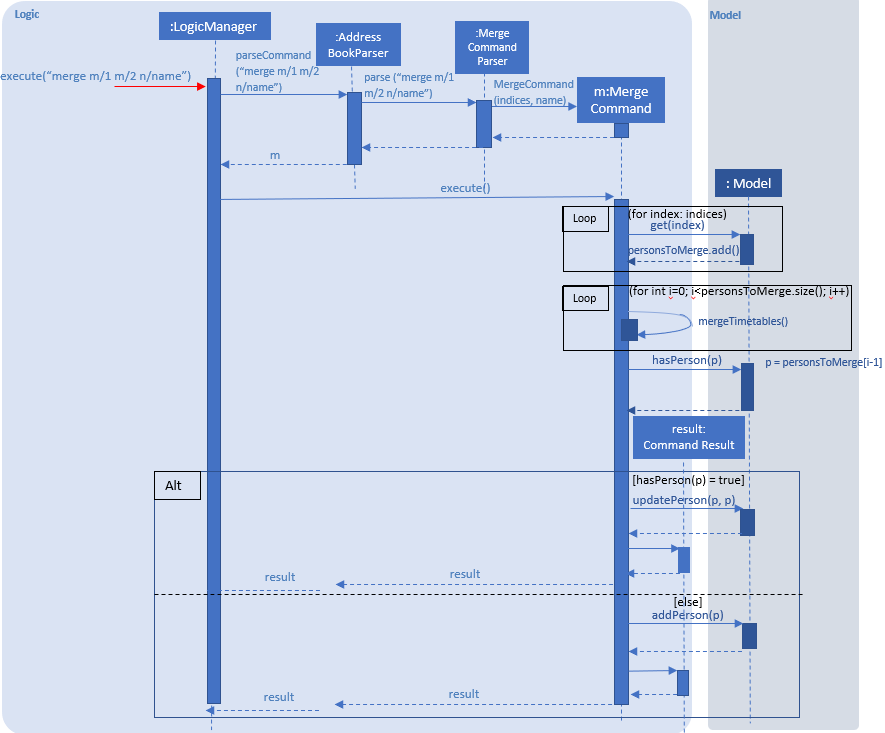
3.3. Merge Timetable Feature
3.3.1. Current Implementation
The merge feature allows for users to select multiple contacts and outputs a merged timetable with all
their common free slots. When the user inputs the indexes of the contacts he wants to merge, the Person(s) are stored
in an array , personsToMerge. The array is then iterated through, merging the all objects inside and
outputting a final Person to be added to the address book.
Given below is an example usage scenario and how the merge mechanism behaves at each step.
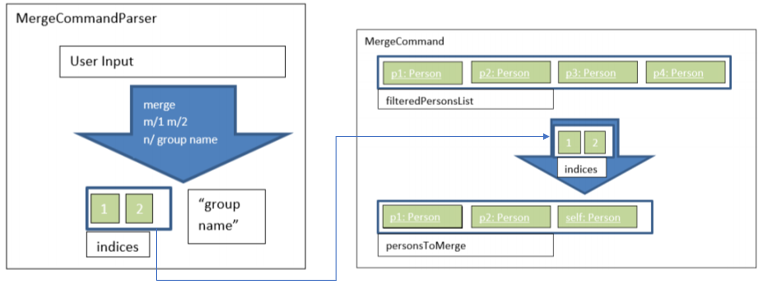
Step 1. The user selects the indexes of the contacts he wants to merge and inputs a group name. MergeCommandParser
takes the indexes and puts it in a list. It then calls MergeCommand with the list and the group name as
arguments. The Merge Command uses the list of indexes and the filteredPersonsList to create and fill the array
personsToMerge. Your own contact, Person with "self" Tag is always added to the array.
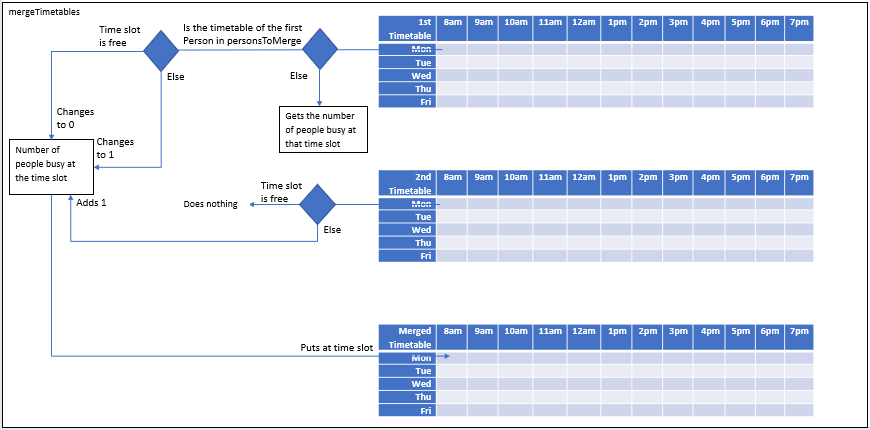
Step 2. The mergeTimetable function is called on each Person in personsToMerge and the element after it. The merge
Timetable function iterates through all the time slots in both timetables and creates a new time table based on them.
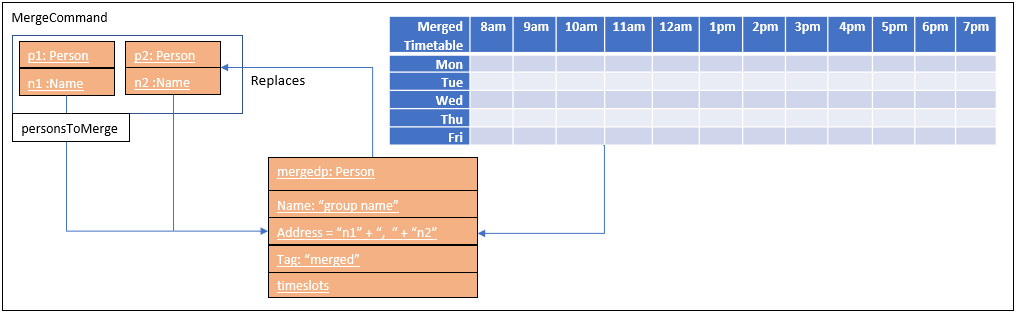
Step 3. The Name`s of each `Person are appended together and gets saved in the Address of the merged
Person. The merged timetable and a "merged" Tag are added to the merged Person. The merged Person is also
given a placeholder Email and Phone. "merged" Tag causes these Persons(s) to be displayed in a separate list
in the UI.
Step 4. When personsToMerge is fully iterated through, the last
Person inside is added to the address book. If there already exists a Person with the same Name, that
Person is updated and a CommandResult reflecting this is shown.
The following sequence diagram shows how the merge function works.
3.3.2. Design Considerations
Aspect: How merge executes
-
Alternative 1 (current choice): Uses a "merged"
Tagto differentiate between merged and normal contacts. The merged contacts are displayed in a separate part of the UI with the placeholderEmailandPhoneundisplayed.Addressis used to display the names of all thePerson`s merged together to create the merged `Person.-
Pros: Easier to implement since it does not require creating a new Class.
-
Cons: Violates SOC principles because now
Addressis used both to store addresses and names. This could lead to potential bugs ifAddressis changed to have different requirements to be considered valid.
-
-
Alternative 2 (To be implemented in V2): Have a specific Class that has timetable and name that is updated with the merged timetable and names of people being merged.
-
Pros: Better follows Separation of Concerns Principle.
-
Cons: Requires more time to implement.
-
3.4. Update Current Merged Feature
3.4.1. Current Implementation
Given the scenario where a user has created a merged time-table (i.e. a mergedPerson / Person with Tag-merged) of several contacts (i.e. a Person / Person with no Tag), and one or more contacts had updated their time-tables after the merged time-table had been created, the creator of the merged time-table would previously have to delete the existing merged time-table and manually create another merged time-table to accommodate the changes in the time-table(s).
With the update feature, users are able to update an existing mergedPerson, if there are any changes to the composition of the mergedPerson. Such changes include the update of one or more Person time-tables or deletions of Persons(s).
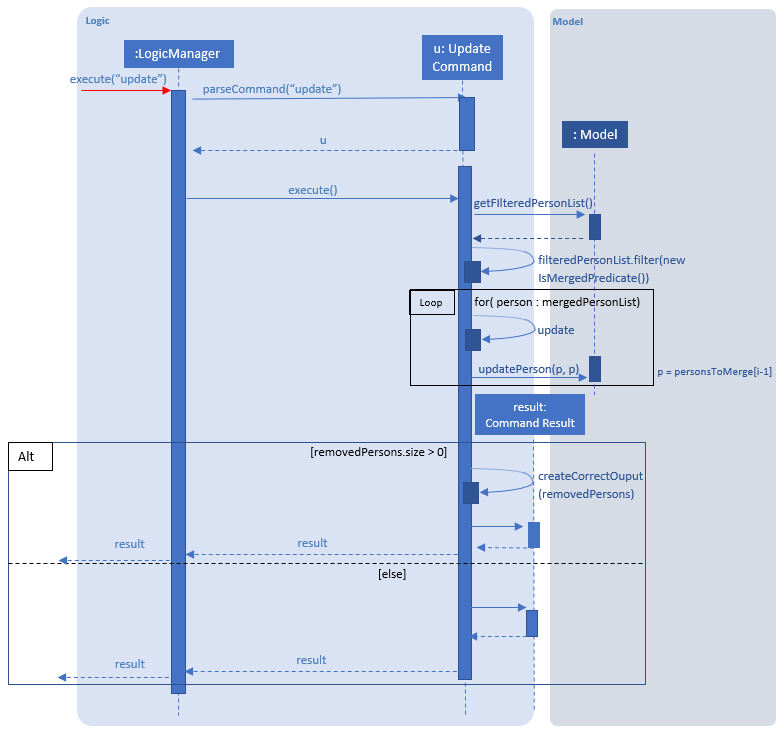
Given below is an example of a scenario where update is used and how the merge mechanism behaves at each step.
Step 1:
After the user inputs update, a list of mergedPerson is retrieved. This list (a.k.a. mergedPersonsList) is iterated through, updating each mergedPerson within mergedPersonsList.
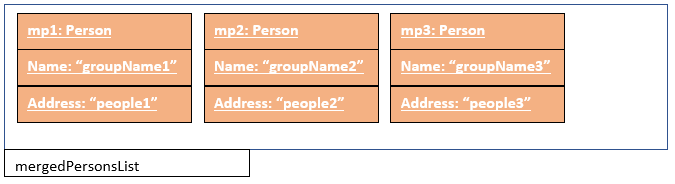
Step 2:
The Name of each mergedPerson is saved as groupName.
To find a desired Person for updating within mergedPerson, the Address of each mergedPerson is tokenized (i.e. split up), and the desired Person is searched against the names within Address. This is the same underlying mechanism as the find command.
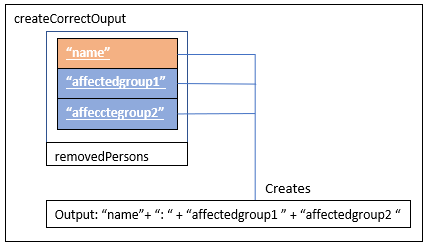
If the desired Person for updating is found, the Person is added to an array called personsToMerge. Else, if the desired Person cannot be found, both groupName and mergedPerson are stored in removedPersons, which is a map of arrays. To find the corresponding mergedPerson in removedPersons, use groupName as the key (i.e. identifier).
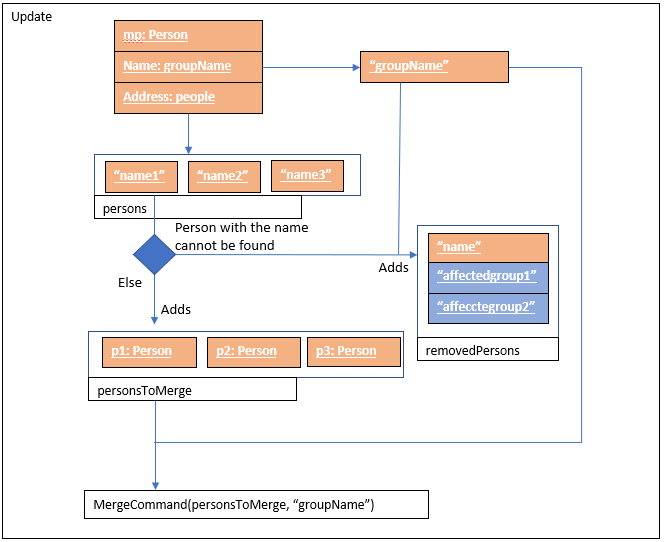
Step 3:
The merged Person is now updated, using the same underlying mechanism as the merge feature. If removedPersons is not empty, it returns a CommandResult showing the Person(s) removed and the affected merged Person(s).
The following sequence diagram shows how the update function works.
3.4.2. Design Considerations
Aspect: How update executes
-
Alternative 1 (current choice): Updates
mergedPersononly whenupdateis specifically executed by the user as a command. ThePersons who are part of amergedPersonare then retrieved using their names at the time of merging.-
Pros: Faster execution time as NSync only needs to run the updating when
updateis specifically executed as a command by the user. -
Cons: Could lead to a mis-match in information between individual
Persons themselves, and themergedPersonwhomPersonis part of. This mis-match may also persist if thePerson's name has been modified.
-
-
Alternative 2 (To be implemented in v2.0): Execute
updatein an under-lying call immediately whenever there is a relevant change (i.e. if aPersonwho is part ofmergedPersonhas edited their name or changed their time-table, or if aPersonis no longer part of themergedPerson).-
Pros: Brings about more convenience for users, and it is more intuitive to them, since they have to only enter 1 command instead of 2. Prevents the bug caused by editing a
Person's name and then executingupdate, as mentioned under cons of current choice. -
Cons: Overall execution time is slower if there are many
mergedPersons, and manyedits are done. This is because mergedPersonsList is iterated through each timeeditis done, to examine eachmergedPersons.
-
3.5. Sorting of Contacts Feature
3.5.1. Current Implementation
To make the codebase easy to understand for you as a developer, we implemented the sorting mechanism with
UniquePersonListHelper, which is facilitated by UniquePersonList,
which keeps a list of unique persons in AddressBook.
UniquePersonListHelper sorts the contacts in UniquePersonList in an lexicographical order, according
to the person’s name. It implements the following operations:
-
UniquePersonList#add()— Adds a new person toUniquePersonList, and hence the contact list -
UniquePersonList#remove()— Removes a new person toUniquePersonList, and hence the contact list -
UniquePersonList#setPerson()— Sets a new person, in place of an existing person, toUniquePersonList, and hence the contact list -
UniquePersonList#setPersons()— Sets a list of persons, in place of the current list of persons, toUniquePersonList, and hence the contact list -
UniquePersonList#contains()— Checks if a person is already a part ofUniquePersonList, and hence the contact list
These operations are exposed in the Model interface, through ModelManager, then through AddressBook.
In Model, they are exposed as Model#addPerson(), Model#deletePerson(), Model#updatePerson(),
Model#resetData(), and Model#hasPerson() respectively.
Within ModelManager, the above listed operations are directly exposed as
ModelManager#addPerson(), ModelManager#deletePerson(), ModelManager#updatePerson(),
ModelManager#resetData(), and ModelManager#hasPerson() respectively.
Within AddressBook, the above listed operations are directly exposed as
AddressBook#addPerson(), AddressBook#removePerson(), AddressBook#updatePerson(),
AddressBook#setPersons(), and AddressBook#hasPerson() respectively.
Because UniquePersonListHelper stores persons in a treemap, with person name as the key, and person
as the value in the key-value pair of the treemap, it is able to automatically sort persons according
to their names. Therefore, it is possible to iterate through UniquePersonListHelper,
in an in-order depth-first-search, to acquire the sorted order of persons. This sorted order will be
copied into UniquePersonList.
Given below is an example usage scenario and how the sorting mechanism behaves at each step.
Step 1. The user launches the application for the first time. The UniquePersonListHelper will be initialized
with the saved persons of the application. For this example, let us assume that the UniquePersonList
is empty, and hence, there are no saved persons.
UniquePersonList will also be initialized, and will read inputs from UniquePersonListHelper. Since
UniquePersonListHelper is empty, UniquePersonList will also be empty. This is shown in the figure below.

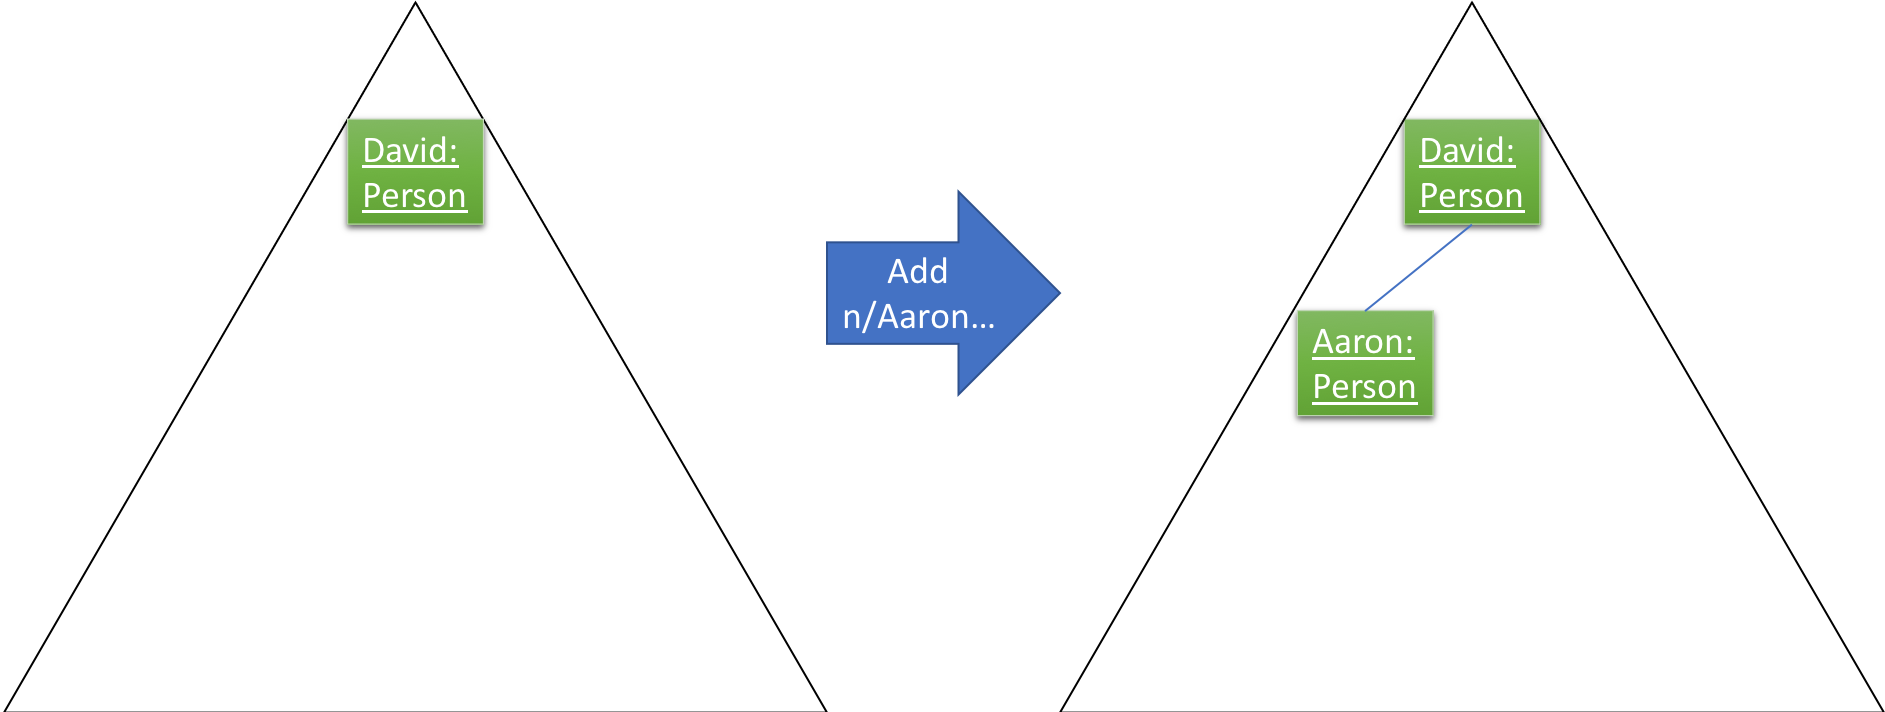
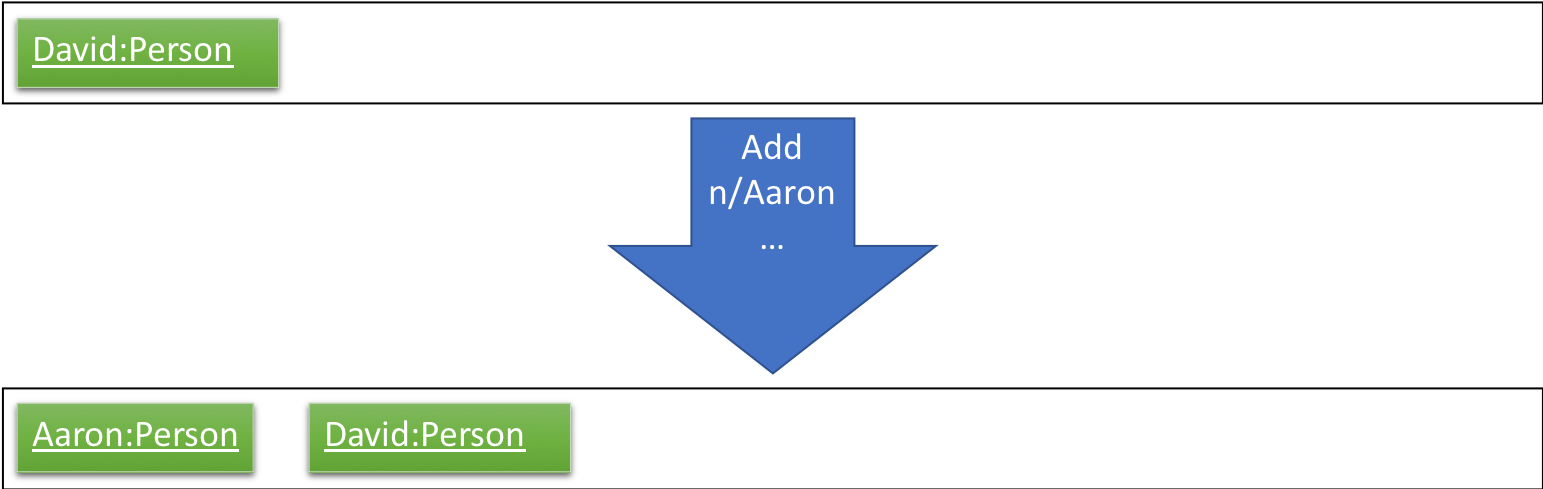
Step 2. The user executes add n/David … command, which calls Model#addPerson(), to add a new person.
The new person will be added to UniquePersonListHelper, and UniquePersonList will take reference from
UniquePersonListHelper. This is shown in the figure below.

UniquePersonListHelper has the sorted order of person, and this sorted order will be copied into
UniquePersonList. This is shown in the figure below.

The following sequence diagram shows how the UniquePersonList stays sorted when an add command is executed:
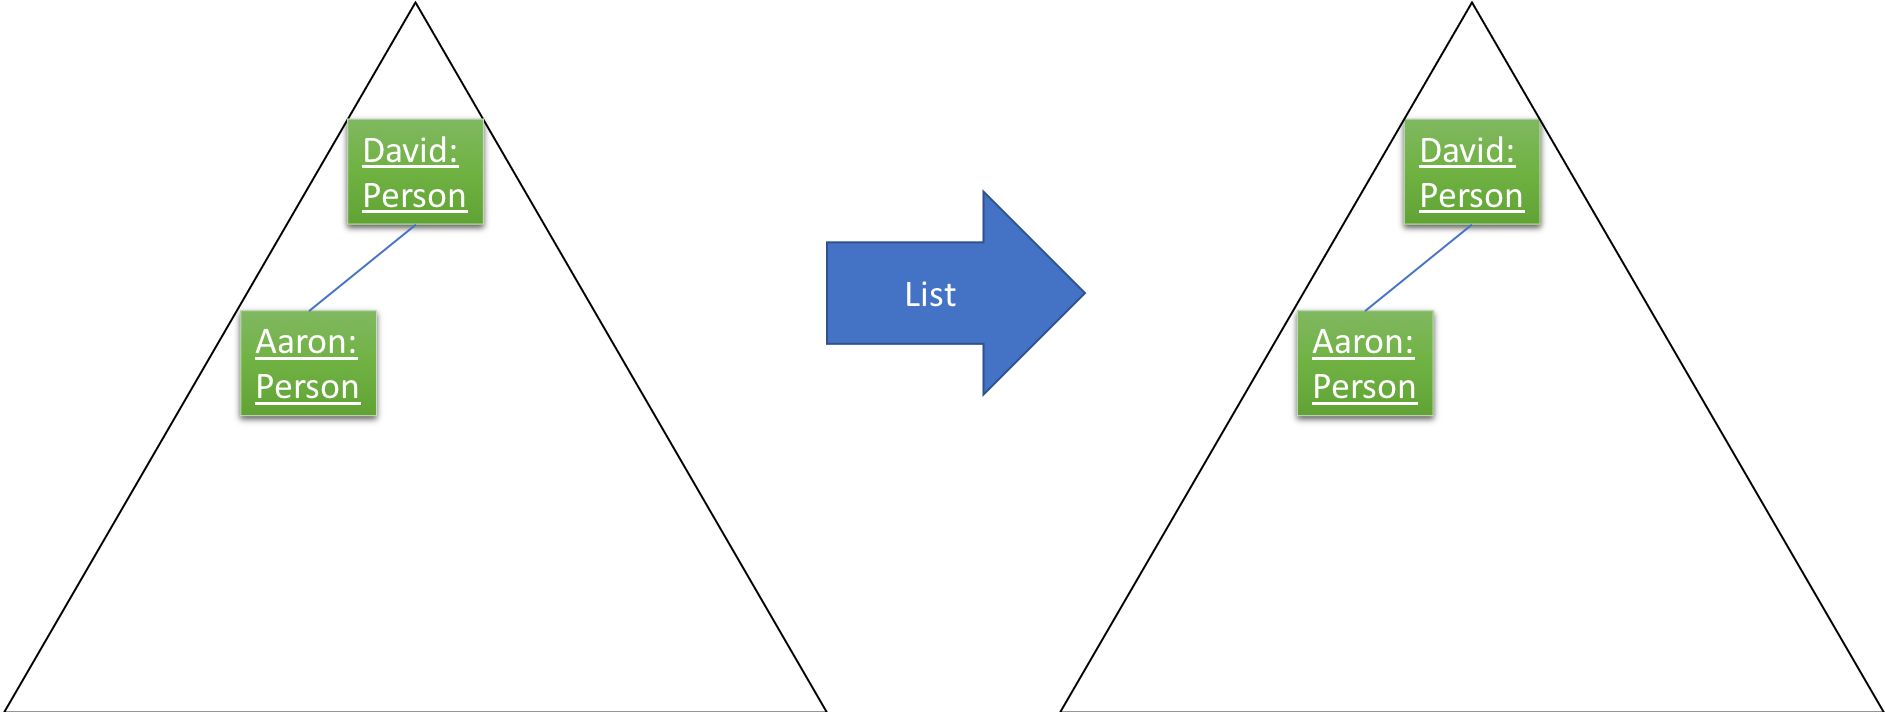
Step 3. The user executes add n/Aaron …, which also calls Model#addPerson(), to add a new person.
Like step 2, the new person will be added to
UniquePersonListHelper.
This is shown in the figure below.
UniquePersonList will take reference from UniquePersonListHelper, as shown in the figure below.
Step 4. The user executes add n/Bella …, which also calls Model#addPerson(), to add a new person.
Because lexicographically, "B" comes before "D", person Bella, will be placed between Aaron and David.
UniquePersonListHelper stores persons in a treemap, and the red-black tree underlying data structure of
treemap, is able to handle this. The new person will be added to UniquePersonListHelper in a sorted order,
as shown in the figure below.
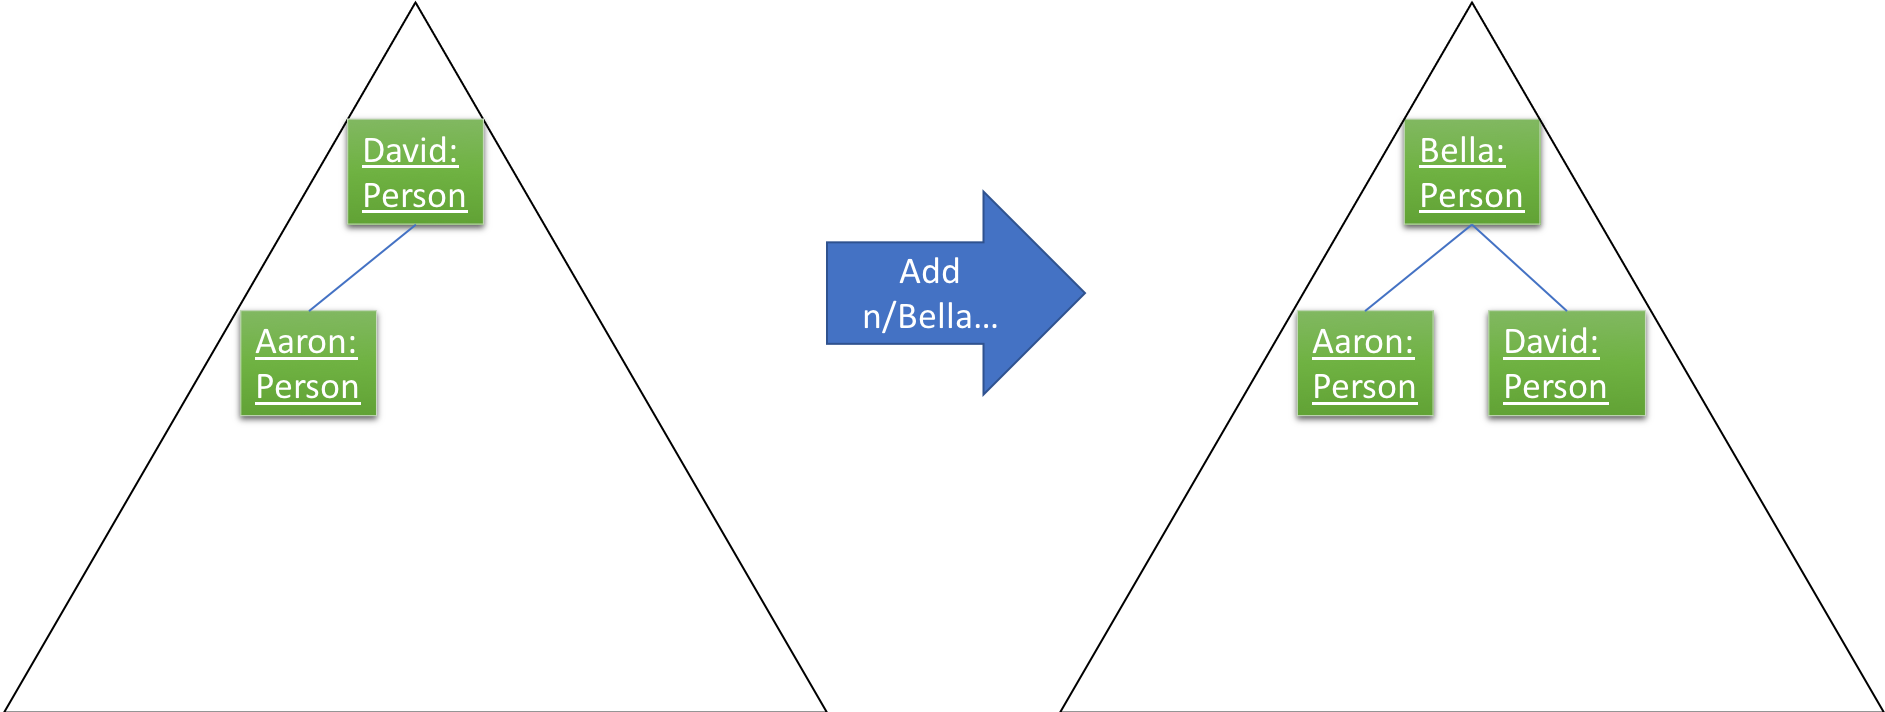
UniquePersonList will take reference from UniquePersonListHelper, as shown in the figure below.
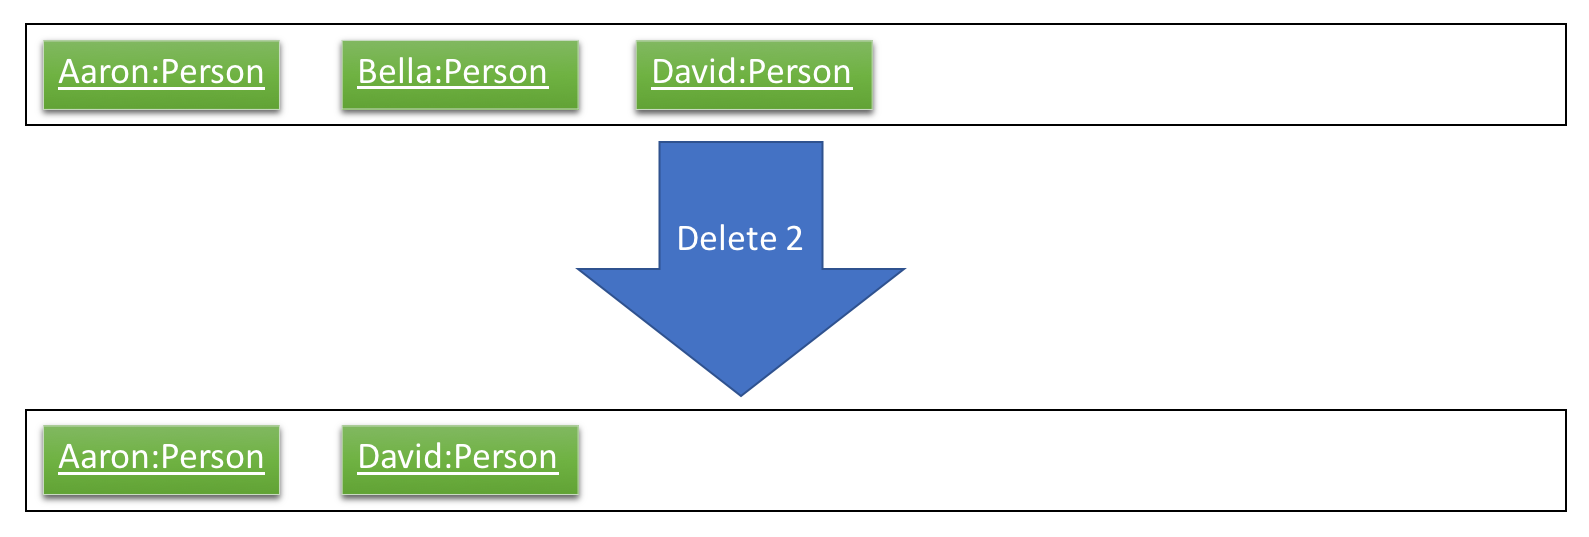
Step 5. The user now decides that adding the person Bella was a mistake. Person Bella should not be in the AddressBook.
The user wishes to delete the person Bella, by executing the delete 2 command. This calls Model#deletePerson().
The delete 2 command will check if Bella is a valid person, and if so, will delete the person Bella.
The red-black tree which is the underlying data structure of treemap, is able to handle this operation. It simply replaces the node it is about to delete, with the in-order successor. More operations will be done to ensure a balanced tree, within the underlying red-black tree. This is shown in the figure below.
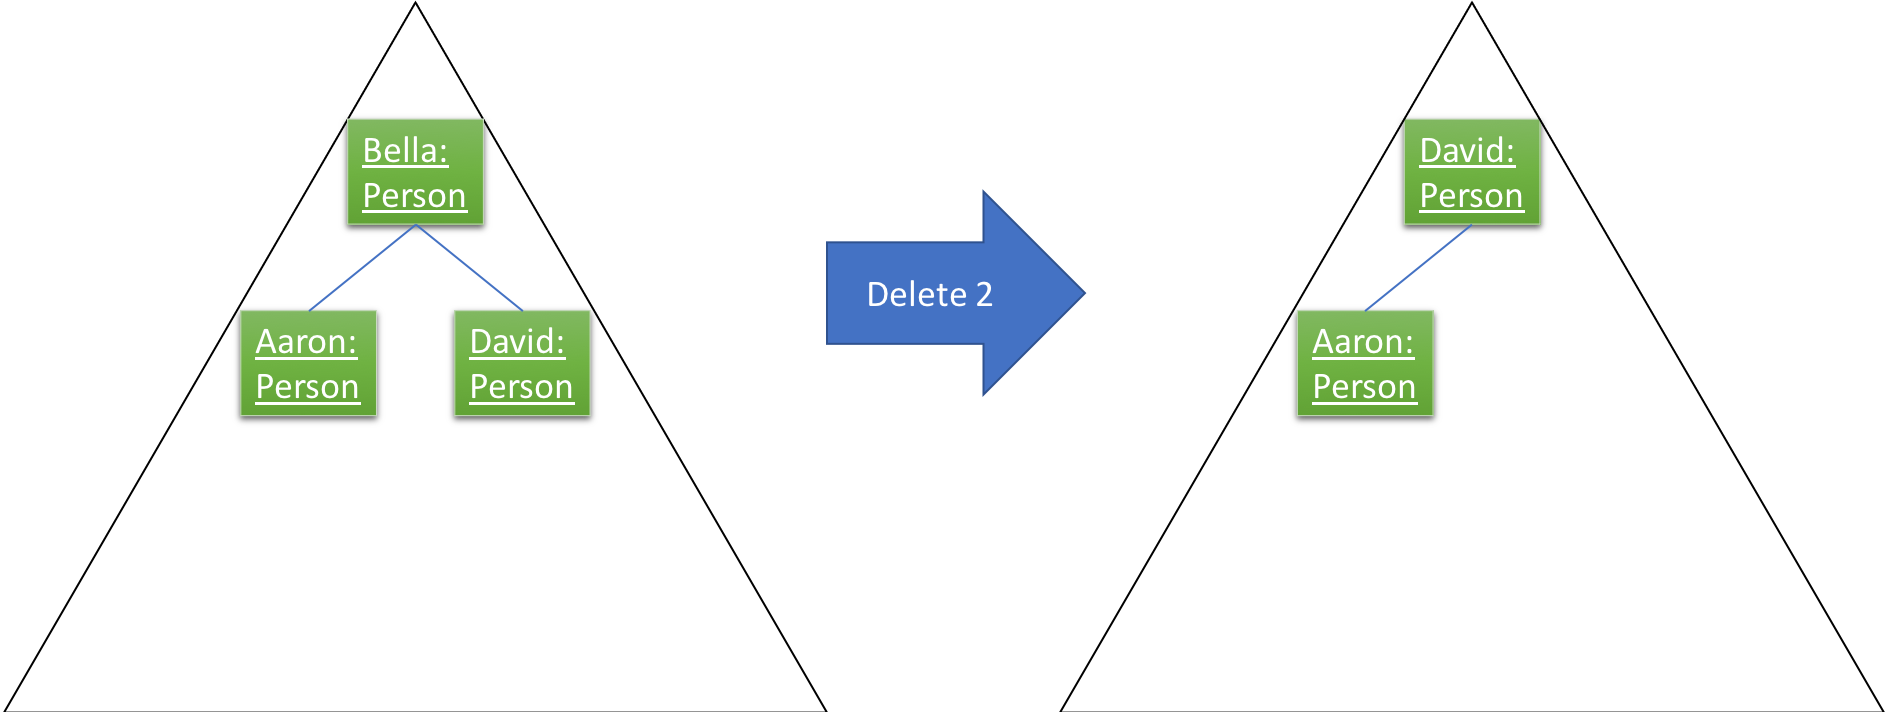
UniquePersonList will take reference from UniquePersonListHelper, as shown in the figure below.
If the Bella does not exist in UniquePersonListHelper,UniquePersonListHelper will return an error, and the
delete command will not be executed.
|
The following sequence diagram shows how the UniquePersonList stays sorted when an delete command is executed:
It is very similar to that of the add command.

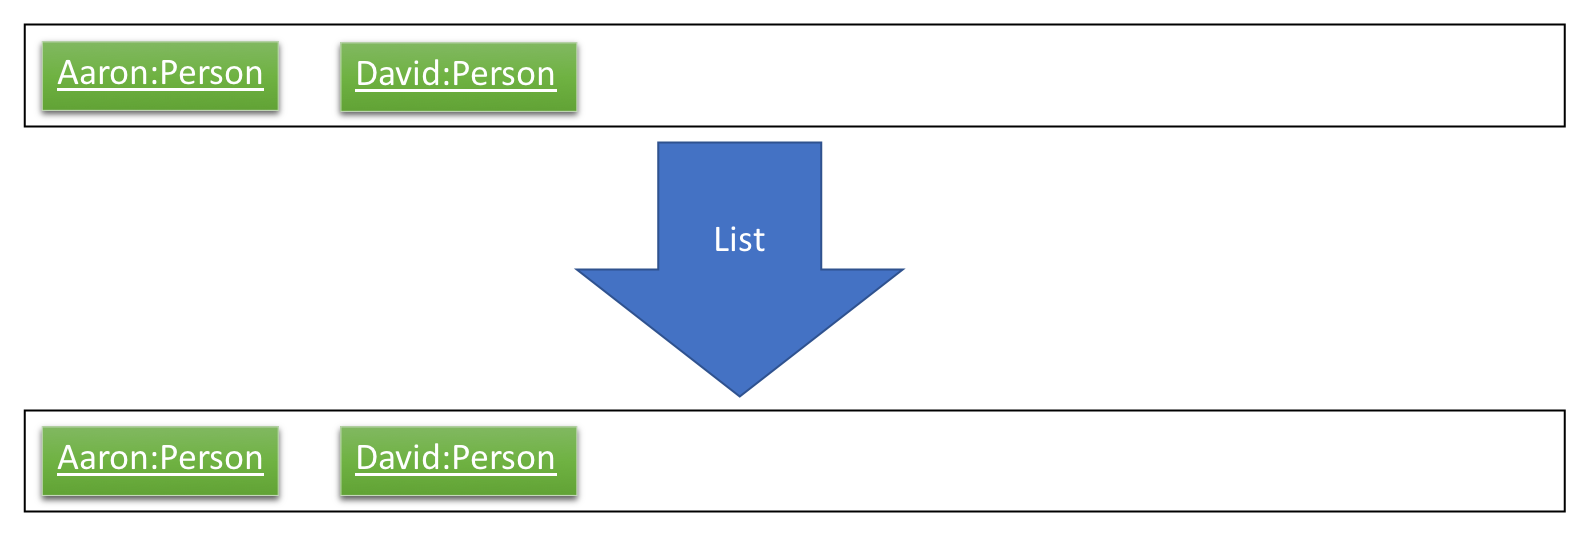
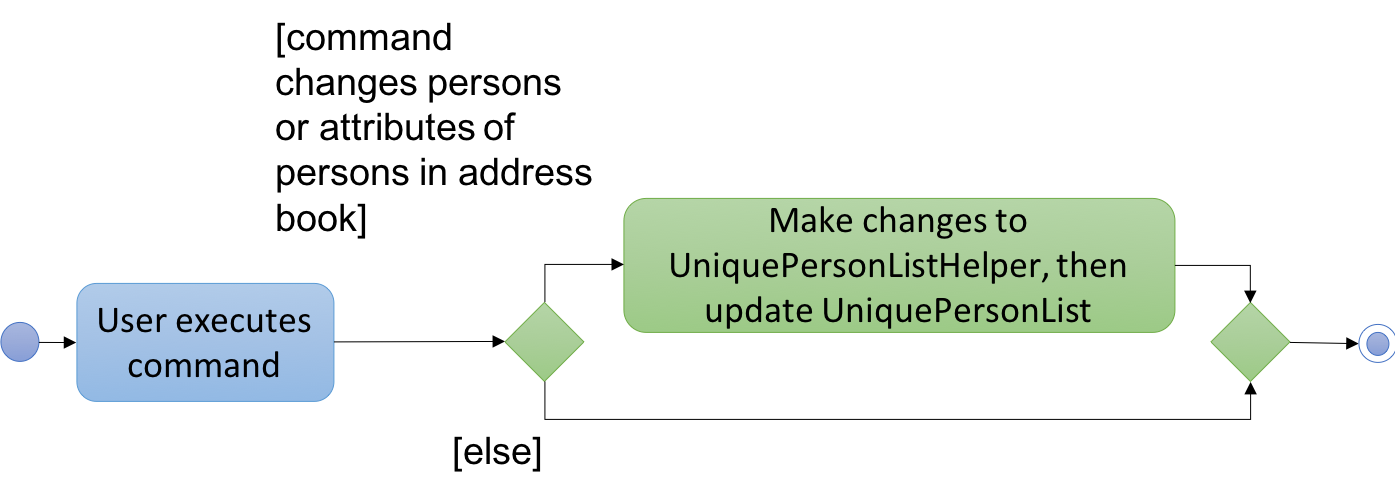
Step 6. The user then decides to execute the command list. Commands that do not modify the address book, such as
list, will usually not call Model#addPerson(), Model#deletePerson(), Model#updatePerson(), Model#resetData(),
or Model#hasPerson(). Thus the state of UniquePersonListHelper will remain unchanged. This is shown in the figure
below.
Therefore, UniquePersonList will also remain unchanged, as shown in the figure below.
Step 7. The user executes clear, which calls Model#resetData(). This replaces all data in the address book with an
empty address book. Hence, UniquePersonListHelper will be cleared of all persons. This is shown in the figure below.
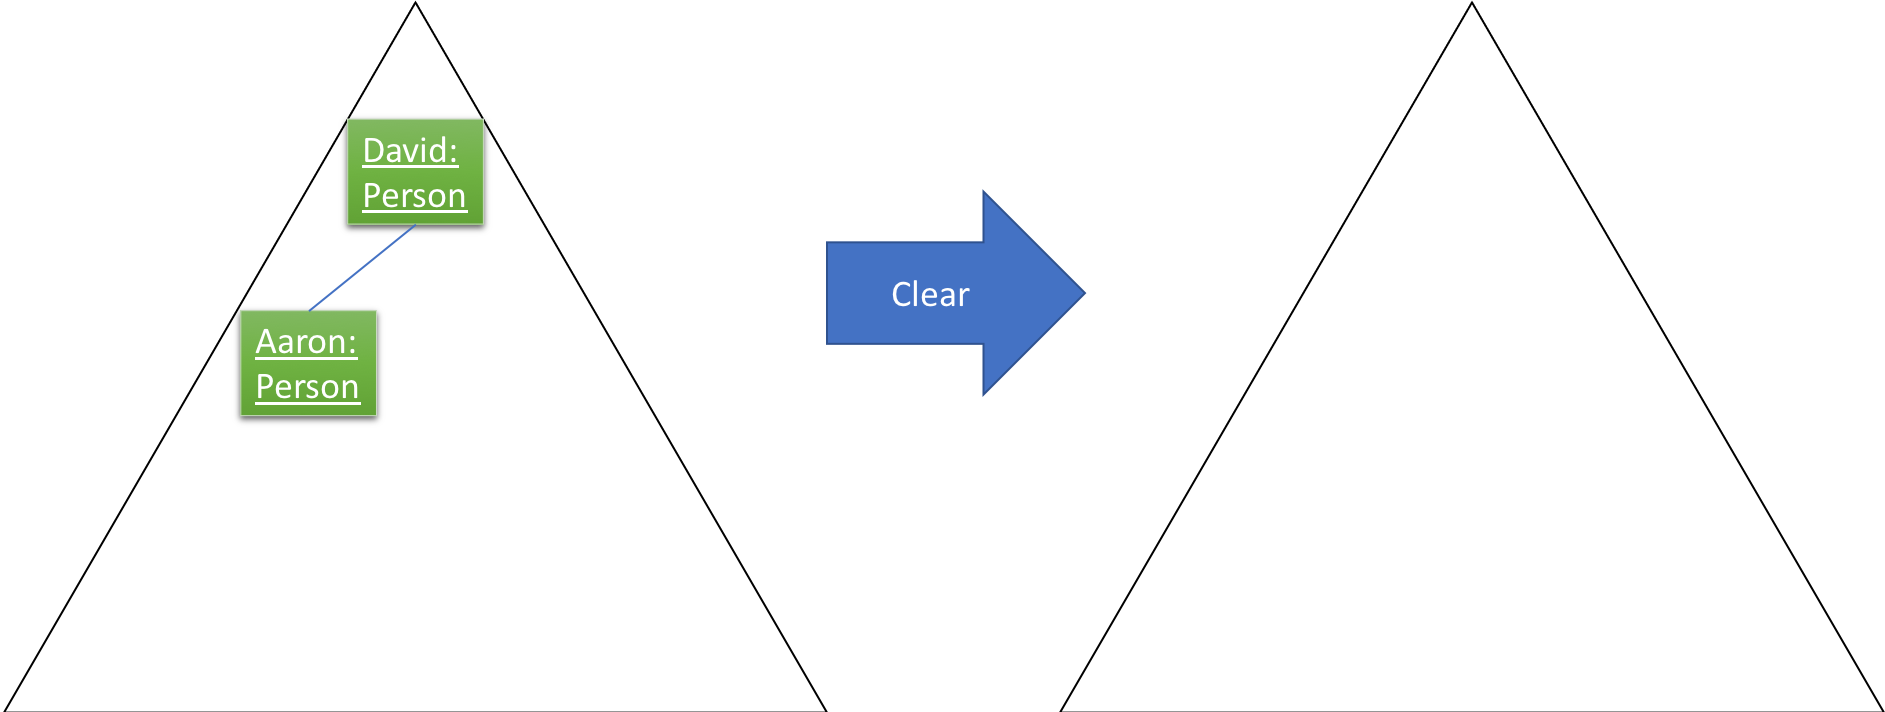
Therefore, UniquePersonList will also be cleared of all persons, as shown in the figure below.

The following activity diagram summarizes what happens when a user executes a new command:
3.5.2. Design Considerations
Aspect: How the list is sorted
-
Alternative 1 (current choice): Implement a helper class, UniquePersonListHelper, which uses a treemap to sort the names. Clears the UniquePersonList every time a change is made, and iterates through the UniquePersonListHelper, to build a new UniquePersonList.
-
Pros: Easy to implement. Allows for minimal and compartmentalised changes throughout the code base. Fast overall time complexity of O(N).
-
Cons: May have performance issues in terms of memory usage, which can be complicated for you as a developer to rectify.
-
-
Alternative 2: Implement a comparator in the current UniquePersonList.
-
Pros: Will use less memory, because there is no need for a helper class or data structure.
-
Cons: It has a time complexity of O(N log N), which is slower than our chosen implementation.
-
Aspect: Defensive programming practices for helper class
-
Alternative 1 (current choice): Implement all checks for errors in the helper class,
UniquePersonListHelperand none inUniquePersonList. This is because the helper class is in charge of the actual execution of the program. If the checks for errors are implemented inUniquePersonListonly, it is possible for a new developer to accidentally bypass the checks.-
Pros: Prevents unnecessary checks and hence, potentially confusing code for you as a developer.
-
Cons: If any changes are made to the helper class in the future, e.g. removing the helper class, you as a developer will have to remember to implement your own checks.
-
-
Alternative 2: Implement all checks for errors in both
UniquePersonListandUniquePersonListHelper.-
Pros: This would add an additional layer of defence to possible careless mistakes by developers in the future. E.g. If you were to make your own version of the helper class but forget to implement their own checks for errors,
UniquePersonListwould still have backup checks. -
Cons: Introducing redundant checks, which would be misleading, This makes code harder to understand. Redundant checks might also incorrectly encourage careless programing habits for you as a developer.
-
3.6. Logging
We are using java.util.logging package for logging. The LogsCenter class is used to manage the logging levels and logging destinations.
-
The logging level can be controlled using the
logLevelsetting in the configuration file (See Section 3.7, “Configuration”) -
The
Loggerfor a class can be obtained usingLogsCenter.getLogger(Class)which will log messages according to the specified logging level -
Currently log messages are output through:
Consoleand to a.logfile.
Logging Levels
-
SEVERE: Critical problem detected which may possibly cause the termination of the application -
WARNING: Can continue, but with caution -
INFO: Information showing the noteworthy actions by the App -
FINE: Details that is not usually noteworthy but may be useful in debugging e.g. print the actual list instead of just its size
3.7. Configuration
Certain properties of the application can be controlled (e.g App name, logging level) through the configuration file (default: config.json).
3.8. Download Commands
Both downloadSelectNotes and downloadAllNotes extends on the downloadAbstract class which itself extends from the
command class. The implementation is similar up till the downloading segment. The download
commands uses Selenium Chromedrivers to initiate downloads from the internet.
The following class diagram shows the relationship of downloadAllNotes,downloadSelectNotes as well as
downloadAbstract.

3.8.1. DownloadAllNotes command
The following Sequence diagram shows how downloadAllNotes is handled.
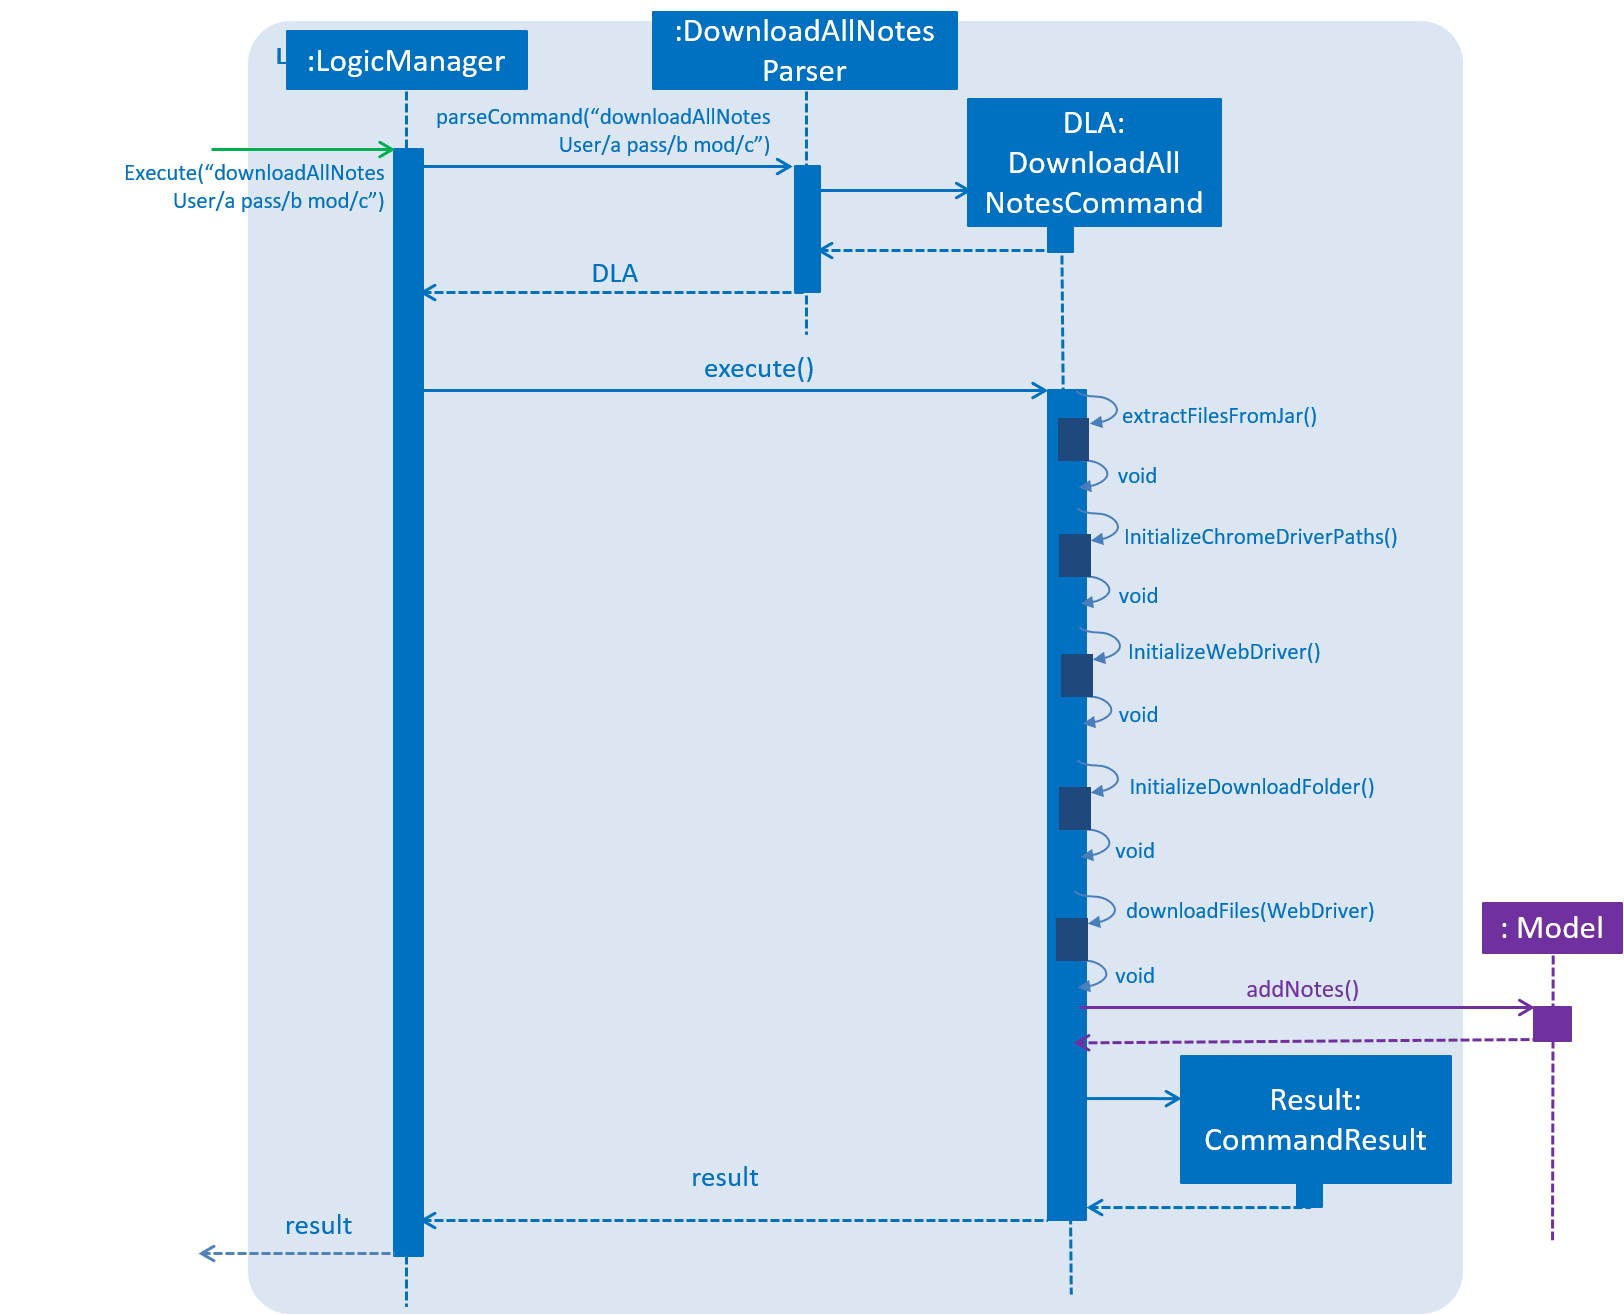
Format: downloadAllNotes downloadAllNotes [user/IVLE USERNAME] [pass/IVLE PASSWORD] [mod/ENROLLED MODULE]
Current Implementation
Step 1: Extract files from Jar. Since Selenium ChromeDriver requires it to be present in the directory as an executable inorder to be ran, it would need to be extracted from NSync.jar before carrying on. Additionally, a Notes folder would be created to store the notes downloaded.
Step 2: Set the webdriver.chrome.driver system variable to the location of the ChromeDriver executable. This step is necessary.
Step 3: Set the download path and other settings for ChromeDriver.
| Headless mode for ChromeDriver has been disabled due to security reasons, an alternative is to start ChromeDriver in an unviewable location on the screen to prevent disrupting the users interactions. |
Step 4: Login into IVLE , and check if successful. If not, a CommandExeption will be thrown
to alert the user that either IVLE USERNAME or IVLE PASSWORD is incorrect.
Step 5: If user is logged in, check if the ENROLLED MODULE exists. If not, a CommandException will
be thrown to alert the user that the ENROLLED MODULE specified does not exist.
Step 6: Navigate to the IVLE download page, select all files and download as .zip file.
| While Downloading, the program would introduce "busy waiting" to prevent the ChromeDriver from terminating before the download is complete. |
Step 7: Unzip the files and store it in a folder created based on the name of ENROLLED MODULE inside the Notes folder created at Step 1.
3.8.2. DownloadSelectNotes Command
The following Sequence diagram shows how downloadAllNotes is handled.
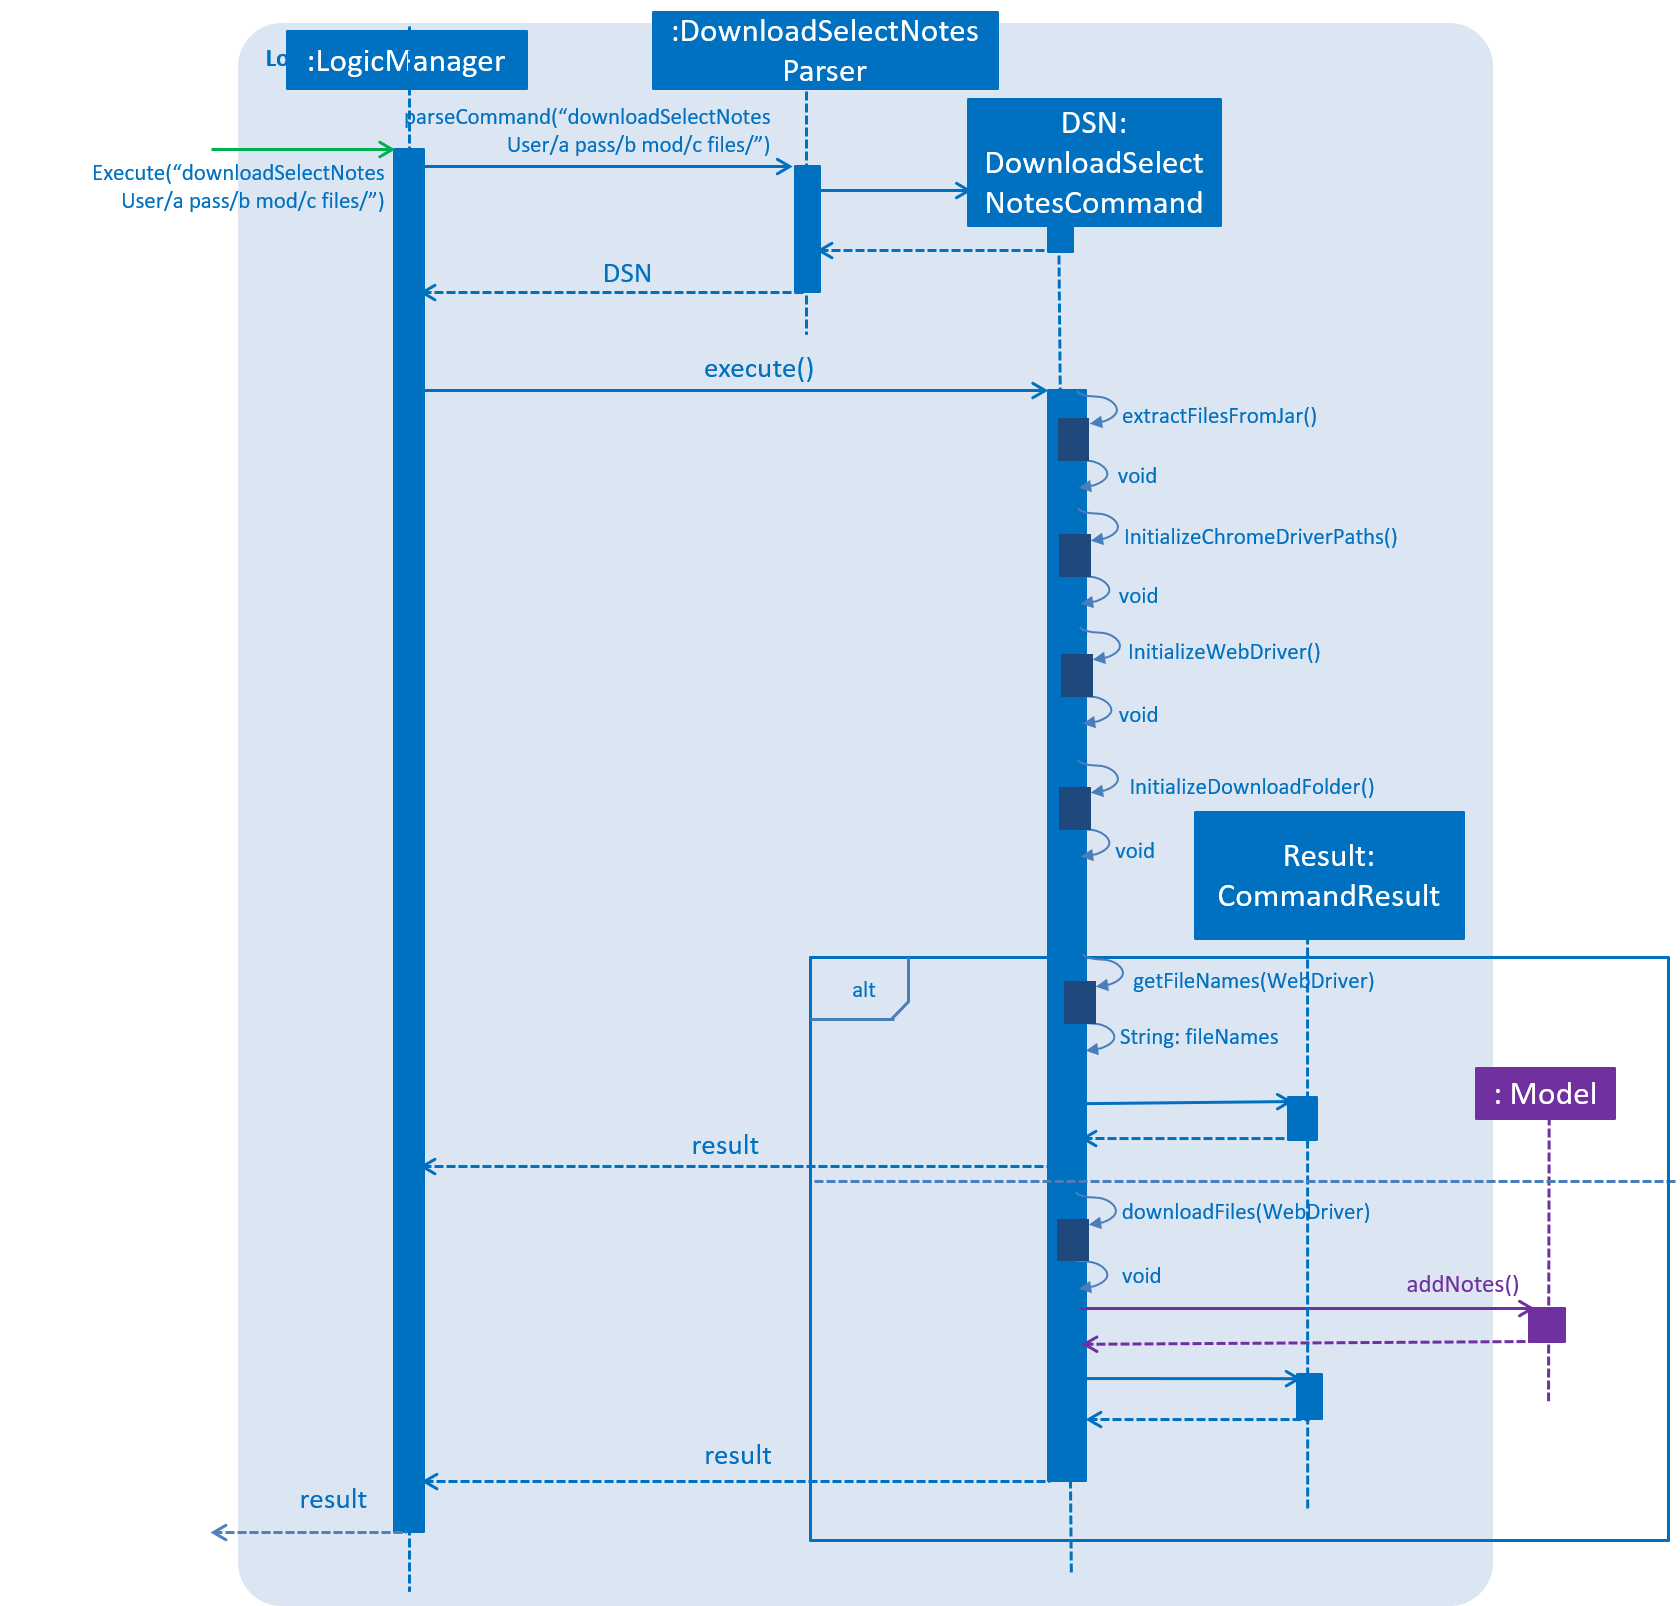
Format: downloadSelectNotes [user/IVLE USERNAME] [pass/IVLE PASSWORD] [mod/ENROLLED MODULE] [file/FILE INDEXES: 1,2,3…n]
The existance of the file/ prefix is optional, and the existance of this prefix will affect the execution
|
3.8.3. Current Implementation
Step 1-5: is exactly the same as DownloadAllNotes command.
Step 6a: If user has NOT entered a file/ prefix, the program will fetch all available file names and store it in a formatted string; A static FILE INDEX will be appended to the front of the file name. The formatted string is returned as a CommandResult.
Step 6b: If user has entered a file/ prefix. The program will download files according to the FILE INDEXES supplied. It is stored in the Notes folder created at Step 1.
If an incorrect file index has been supplied, download will stop after encountering an invalid index. Example: file/1,2,9000,3 if 1,2,3 are valid file indexes, only file 1,2 will be downloaded.
|
Design Considerations
Aspect 1: Which Driver is used
Implementation 1 (Current Implementation)
Currently downloadNotes uses ChromeDriver to initiate its downloads. It provides capabilities for navigating to web pages, user input, JavaScript execution, and more.
The user would be required to have Google Chrome installed inorder to use this function
Pros: Google Chrome is one of the most widely used browsers in the world. Thus statistically speaking, most NUS users would already have Google Chrome installed.
Cons: Google Chrome is extremely ram intensive, and the function would fail to cater to users who do not use Google Chrome.
Implementation 2(HTML unitdriver)
HTML UnitDriver is the most light weight, natively headless and the fastest implementation of WebDriver.
Pros: Its extremely fast, does not require prior installation of any other applications to function.
Cons: It uses a javaScript engine called Rhino. This engine is incompatible with IVLE's usage of javaScript. Making it unable to navigate past Step 5.
Aspect 2: How notes are downloaded
-
Implementation 1 (Current Implementation)**
As mentioned previously, currently downloadNotes uses ChromeDriver to initiate its downloads.
Pros: The current implementation navigates through the IVLE Web page to download the files "Pseudo" manually. Thus we could be easily morph this implementation to suit other platforms and websites. Its also easy to update.
example: NTU web portal
Cons: It requires user to have Google Chrome installed.
Implementation 2 (IVLE API)
An alternative implementation is to use the existing IVLE API to instantiate the downloads.
Pros: Its supported by NUS, and thus should be more reliable than the IVLE platform.
Cons: The existing IVLE API is outdated, many parts are not functional as of 10-11-2018. Furthermore, IVLE is migrating to luminous as of 2019, thus if implemented with IVLE API, it would require a ground up rebuild to keep the function operational.
3.9. ShowNotes Command
ShowNotes recursively searches the Notes folder created by DownloadNotes Command.
3.9.1. Current Implementation
A static String is used to store all the information notesResult.
The files are differentiated by 2 catagories: Directories and Others. If currentFile is a directory, a recursive call will be made and the directory name appended with N tabs would be added to notesResult , else, just the file name and N tabs would be apprended and added to ` notesResult`.
N refers to the number of recursive calls made up till the point of arriving at currentFile.
|
3.9.2. Design Considerations
The Current implementation is the most efficient way to list out all the files in a directory. An Iterative method could have been used. However due to the fact that the relative "depth" of a directory is unknown. It would be rather counter-intuitive to search iteratively.
4. Documentation
We use asciidoc for writing documentation.
| We chose asciidoc over Markdown because asciidoc, although a bit more complex than Markdown, provides more flexibility in formatting. |
4.1. Editing Documentation
See UsingGradle.adoc to learn how to render .adoc files locally to preview the end result of your edits.
Alternatively, you can download the AsciiDoc plugin for IntelliJ, which allows you to preview the changes you have made to your .adoc files in real-time.
4.2. Publishing Documentation
See UsingTravis.adoc to learn how to deploy GitHub Pages using Travis.
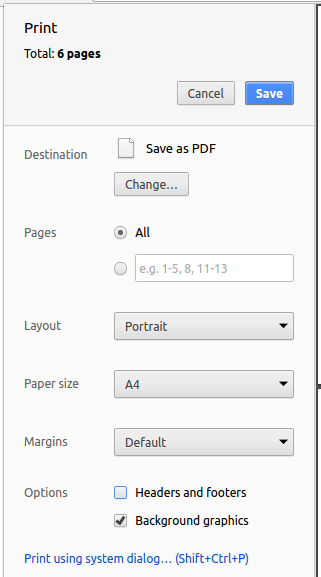
4.3. Converting Documentation to PDF format
We use Google Chrome for converting documentation to PDF format, as Chrome’s PDF engine preserves hyperlinks used in webpages.
Here are the steps to convert the project documentation files to PDF format.
-
Follow the instructions in UsingGradle.adoc to convert the AsciiDoc files in the
docs/directory to HTML format. -
Go to your generated HTML files in the
build/docsfolder, right click on them and selectOpen with→Google Chrome. -
Within Chrome, click on the
Printoption in Chrome’s menu. -
Set the destination to
Save as PDF, then clickSaveto save a copy of the file in PDF format. For best results, use the settings indicated in the screenshot below.
Saving documentation as PDF files in Chrome
4.4. Site-wide Documentation Settings
The build.gradle file specifies some project-specific asciidoc attributes which affects how all documentation files within this project are rendered.
Attributes left unset in the build.gradle file will use their default value, if any.
|
| Attribute name | Description | Default value |
|---|---|---|
|
The name of the website. If set, the name will be displayed near the top of the page. |
not set |
|
URL to the site’s repository on GitHub. Setting this will add a "View on GitHub" link in the navigation bar. |
not set |
|
Define this attribute if the project is an official SE-EDU project. This will render the SE-EDU navigation bar at the top of the page, and add some SE-EDU-specific navigation items. |
not set |
4.5. Per-file Documentation Settings
Each .adoc file may also specify some file-specific asciidoc attributes which affects how the file is rendered.
Asciidoctor’s built-in attributes may be specified and used as well.
Attributes left unset in .adoc files will use their default value, if any.
|
| Attribute name | Description | Default value |
|---|---|---|
|
Site section that the document belongs to.
This will cause the associated item in the navigation bar to be highlighted.
One of: * Official SE-EDU projects only |
not set |
|
Set this attribute to remove the site navigation bar. |
not set |
4.6. Site Template
The files in docs/stylesheets are the CSS stylesheets of the site.
You can modify them to change some properties of the site’s design.
The files in docs/templates controls the rendering of .adoc files into HTML5.
These template files are written in a mixture of Ruby and Slim.
|
Modifying the template files in |
5. Testing
5.1. Running Tests
There are three ways to run tests.
| The most reliable way to run tests is the 3rd one. The first two methods might fail some GUI tests due to platform/resolution-specific idiosyncrasies. |
Method 1: Using IntelliJ JUnit test runner
-
To run all tests, right-click on the
src/test/javafolder and chooseRun 'All Tests' -
To run a subset of tests, you can right-click on a test package, test class, or a test and choose
Run 'ABC'
Method 2: Using Gradle
-
Open a console and run the command
gradlew clean allTests(Mac/Linux:./gradlew clean allTests)
| See UsingGradle.adoc for more info on how to run tests using Gradle. |
Method 3: Using Gradle (headless)
Thanks to the TestFX library we use, our GUI tests can be run in the headless mode. In the headless mode, GUI tests do not show up on the screen. That means the developer can do other things on the Computer while the tests are running.
To run tests in headless mode, open a console and run the command gradlew clean headless allTests (Mac/Linux: ./gradlew clean headless allTests)
5.2. Types of tests
We have two types of tests:
-
GUI Tests - These are tests involving the GUI. They include,
-
System Tests that test the entire App by simulating user actions on the GUI. These are in the
systemtestspackage. -
Unit tests that test the individual components. These are in
seedu.address.uipackage.
-
-
Non-GUI Tests - These are tests not involving the GUI. They include,
-
Unit tests targeting the lowest level methods/classes.
e.g.seedu.address.commons.StringUtilTest -
Integration tests that are checking the integration of multiple code units (those code units are assumed to be working).
e.g.seedu.address.storage.StorageManagerTest -
Hybrids of unit and integration tests. These test are checking multiple code units as well as how the are connected together.
e.g.seedu.address.logic.LogicManagerTest
-
5.3. Troubleshooting Testing
Problem: HelpWindowTest fails with a NullPointerException.
-
Reason: One of its dependencies,
HelpWindow.htmlinsrc/main/resources/docsis missing. -
Solution: Execute Gradle task
processResources.
6. Dev Ops
6.1. Build Automation
See UsingGradle.adoc to learn how to use Gradle for build automation.
6.2. Continuous Integration
We use Travis CI and AppVeyor to perform Continuous Integration on our projects. See UsingTravis.adoc and UsingAppVeyor.adoc for more details.
6.3. Coverage Reporting
We use Coveralls to track the code coverage of our projects. See UsingCoveralls.adoc for more details.
6.4. Documentation Previews
When a pull request has changes to asciidoc files, you can use Netlify to see a preview of how the HTML version of those asciidoc files will look like when the pull request is merged. See UsingNetlify.adoc for more details.
6.5. Making a Release
Here are the steps to create a new release.
-
Update the version number in
MainApp.java. -
Generate a JAR file using Gradle.
-
Tag the repo with the version number. e.g.
v0.1 -
Create a new release using GitHub and upload the JAR file you created.
6.6. Managing Dependencies
A project often depends on third-party libraries. For example, Address Book depends on the Jackson library for XML parsing. Managing these dependencies can be automated using Gradle. For example, Gradle can download the dependencies automatically, which is better than these alternatives.
a. Include those libraries in the repo (this bloats the repo size)
b. Require developers to download those libraries manually (this creates extra work for developers)
Appendix A: Product Scope
Target user profile:
-
has a need to manage a significant number of contacts
-
prefer desktop apps over other types
-
can type fast
-
prefers typing over mouse input
-
is reasonably comfortable using CLI apps
Value proposition: manage contacts faster than a typical mouse/GUI driven app
Appendix B: User Stories
Priorities: High (must have) - * * *, Medium (nice to have) - * *, Low (unlikely to have) - *
| Priority | As a … | I want to … | So that I can… |
|---|---|---|---|
Priority |
As a … |
I want to … |
So that I can… |
|
new user |
see usage instructions |
refer to instructions when I forget how to use the App |
|
user |
add a new person |
|
|
user |
delete a person |
remove entries that I no longer need |
|
user |
find a person by name |
locate details of persons without having to go through the entire list |
|
user |
add a ‘busy’ time slot to my time table |
keep my life organized |
|
user |
delete a ‘busy’ time slot from my time table |
free up that particular time slot |
|
user |
find availability of provided time slot |
decide on my next course of action with that information |
|
user |
download the notes of a specific module in one command |
avoid downloading unnecessary notes |
|
lazy IVLE user |
download all my notes in one command |
avoid the cumbersome experience of visiting IVLE |
|
user |
view the notes already downloaded |
keep track of the notes that I already have |
|
user |
delete all downloaded notes |
free up some space on my local drive |
|
user |
view my enrolled modules |
store my notes according to the modules I am enrolled in |
|
user |
hide private contact details by default |
minimize chance of someone else seeing them by accident |
|
user |
find next ‘available’ time slot (from current time) |
be aware of when my next available time period will be |
|
user |
find next ‘busy’ time slot (from current time) |
be aware of what is coming up for me next |
|
user |
delete the notes of a specified module |
keep my local drive organized |
|
user with many persons in the address book |
locate a person easily |
not waste time when trying to locate a contact |
|
user who needs to arrange a time with a group of other users frequently |
import other users’ ‘busy time slots |
have a centralised record of our schedules for convenience to arrange a common time |
|
user who needs to arrange a time with a group of other users frequently |
find next ‘available’ time slot (from current time) |
easily know when we can next meet up |
Appendix C: Use Cases
(For all use cases below, the System is NSync and the Actor is the user, unless specified otherwise)
Use case: Delete person
MSS
-
User requests to list persons
-
NSync shows a list of persons
-
User requests to delete a specific person in the list
-
NSync deletes the person
Use case ends.
Extensions
-
2a. The list is empty.
Use case ends.
-
3a. The given index is invalid.
-
3a1. NSync shows an error message.
Use case resumes at step 2.
Use case: Delete Selected notes
-
MSS
-
User requests to show all notes
-
NSync shows a list of notes
-
User requests to delete a specific module’s notes
-
NSync deletes the notes
Use case ends.
Extensions
-
2a. The list is empty.
Use case ends.
-
3a. The given request is invalid.
-
3a1. NSync shows an error message.
Use case resumes at step 1.
-
Use case: Delete Multiple Selected notes
MSS
-
User requests to show all notes
-
NSync shows a list of notes
-
User requests to delete a multiples module’s notes
-
NSync deletes the notes
Use case ends.
Extensions
-
2a. The list is empty.
Use case ends.
-
3a. The given request is invalid.
-
3a1. NSync shows an error message.
Use case resumes at step 1.
-
-
3b. The given request is partially valid.
-
3b1. NSync processes only the valid requests.
Use case resumes at step 4.
-
Use case: Delete all notes
MSS
-
User requests delete all downloaded notes
-
NSync deletes all notes
Use case ends.
Extensions
-
2a. There are no downloaded notes is empty.
-
2a1. NSync still runs to ensure that all notes are deleted.
Use case ends.
-
Use case: Download select notes
MSS
-
User request all the available files to download
-
NSync displays all available files to download with index appended at the front of the file name.
-
User request download based on file index
-
NSync downloads files and stores it in the
notesfolder.
Extensions
-
2a. No files to display
-
2a1. NSync displays empty list.
-
2a2. Use case ends
-
-
3a. User requests an invalid file index
-
3a1. NSync does not download invalid file
-
3a2. Use case ends.
-
Use case: Download all notes
MSS
-
User request download all notes
-
NSync downloads all notes in a zip file in the
notesfolder
Extensions
-
1a. User enters wrong username, password or module code.
-
1a1. NSync informs user of the error
-
1a2. Use case ends.
-
C.1. Use case: Merge people
MSS
-
User requests to list persons
-
AddressBook shows a list of persons
-
User requests to create a merged person from specific people in the list and enters a group name
-
A merged person is created and added to AddressBook
Use case ends.
Extensions
-
2a. The list is empty.
Use case ends.
-
3a. One or more given index is invalid.
-
3b. Group name is already in use for another group
-
3a1. AddressBook shows an error message.
-
3b1. Addressbook shows a message saying that group is updated instead of created
Use case resumes at step 2.
-
C.2. Use case: Change timetable
MSS
-
User requests to list persons
-
AddressBook shows a list of persons
-
User requests to create to change the selected time slot of a selected person to a different activity
-
Time slot is changed
Use case ends.
Extensions
-
2a. The list is empty.
Use case ends.
-
3a. One or more given index is invalid.
-
3b. Day is invalid
-
3c. Time is invalid
-
3d. Activity inputted is the same as activity already at the time slot.
-
3a1. AddressBook shows an error message saying the index inputted is invalid
-
3b1. Addressbook shows an error message saying that day inputted is invalid
-
3c1. Addressbook shows an error message saying that time inputted is invalid
-
3d1. Addressbook shows an error message saying that no time slot has been changed
Use case resumes at step 2.
-
C.3. Use case: Filter timetable
MSS
-
User requests to filter persons based on activities or free time slots they have
-
AddressBook shows a filtered list of persons
Use case ends.
Extensions
-
1a. Input after a valid day is not a valid time
-
1a1. AddressBook shows an error message saying the time inputted is invalid
Use case resumes at step 1.
-
Appendix D: Non Functional Requirements
-
Should work on any Windows OS as long as it has Java
9or higher installed. -
Should be able to hold up to 1000 persons without a noticeable sluggishness in performance for typical usage.
-
A user with above average typing speed for regular English text (i.e. not code, not system admin commands) should be able to accomplish most of the tasks faster using commands than using the mouse.
-
To fully make use of downloading notes commands, the user has to have the Google Chrome web browser installed on his computer, and also be an IVLE user in NUS. {More to be added}
Appendix E: Glossary
- IVLE
-
According to the National University of Singapore, Integrated Virtual Learning Environment (IVLE) is a NUS' custom designed and built Learning Management System for the NUS community. It is designed to facilitate and supplement teaching at the National University of Singapore (NUS).
- NUS
-
The National University of Singapore (NUS) is an autonomous research university in Singapore.
- Private contact detail
-
A contact detail that is not meant to be shared with others
Appendix F: Product Survey
Product Name: Google Contacts
Pros:
-
The user is able to have all his contacts automatically synced across multiple devices.
-
The user’s contacts will automatically be transferred over to a new device, if he logs in to his google account on it.
Cons:
-
The user is unable to have a consolidated list of timetables for all his contacts.
-
The user is also unable to access IVLE and download his notes using Google Contacts.
Product Name: NUSMods
Pros:
-
The user is able to all his enrolled modules, and create a visually appealing timetable quickly.
-
The timeslots are retrieved from directly from NUS, which allows the user to rest assured that his timetable is accurate.
Cons:
-
The user is unable to have a consolidated list of timetables for all his contacts.
-
The user is also unable to access IVLE and download his notes using Google Contacts.
Appendix G: Instructions for Manual Testing
Given below are instructions to test the app manually.
| These instructions only provide a starting point for testers to work on; testers are expected to do more exploratory testing. |
G.1. Launch and Shutdown
-
Initial launch
-
Download the jar file and copy into an empty folder
-
Double-click the jar file
Expected: Shows the GUI with a set of sample contacts. The window size may not be optimum.
-
-
Saving window preferences
-
Resize the window to an optimum size. Move the window to a different location. Close the window.
-
Re-launch the app by double-clicking the jar file.
Expected: The most recent window size and location is retained.
-
G.2. Deleting a person
-
Deleting a person while all persons are listed
-
Prerequisites: List all persons using the
listcommand. Multiple persons in the list. -
Test case:
delete main 1
Expected: First contact is deleted from the main contact list. Details of the deleted contact shown in the status message. Timestamp in the status bar is updated. -
Test case:
delete main 0
Expected: No person is deleted. Error details shown in the status message. Status bar remains the same. -
Other incorrect delete commands to try:
delete,delete x(where x is larger than the list size) {give more}
Expected: Similar to previous.
-
G.3. Deleting downloaded notes
Because features which involve downloading notes have been disallowed by NUS, in order to test deleting notes, testers have to manually create notes and delete them. However, because this is not how NSync was designed to work, testers have to restart NSync every time they manually create and delete notes within NSync, in order for NSync to behave correctly.
-
Deleting selected notes
-
Prerequisites: Before starting NSync, go to the directory the .jar file is in. Create a directory titled "notes". Within the newly created "notes" directory, create 5 separate directories titled "CS2101", "CS2113", "GEQ1000", "GER1000", "ST2334". It is up to the tester if he wants to create documents or subdirectories within any of the newly created 5 directories, in order to simulate actual notes being stored within the directories.
-
Test case:
deleteSelectNotes ST2334
Expected: The directory "ST2334" and its contents are deleted from the "notes" directory. "ST2334" will be shown in the first line of the status message, which shows the notes that have been deleted. In the second line of the status message, which shows the entries that are invalid, it will not contain any elements, as "ST2334" is a valid entry.
Timestamp in the status bar is not updated, as this command does not modify the addressBook. -
Test case:
deleteSelectNotes ger1000 geq1000
Expected: No notes are deleted. Expected: No notes are deleted. Error details suggesting for the user to runshowNotesis displayed. Timestamp in the status bar is not updated. This is because only invalid entries are entered, and the entries are case-sensitive. Timestamp in the status bar is not updated, as this command does not modify the addressBook portion of NSync. -
Test case:
deleteSelectNotes GER1000 GEQ1000
Expected: The directories "GER1000" and "GEQ1000" and their contents are deleted from the "notes" directory. "GEQ1000" and "GER1000" will be shown in the first line of the status message, which shows the notes that have been deleted. In the second line of the status message, which shows the entries that are invalid, it will not contain any elements, as "GEQ1000" and "GER1000" are valid entries.
Timestamp in the status bar is not updated, as this command does not modify the addressBook portion of NSync. -
Test case:
deleteSelectNotes CS ST2334
Expected: The directories "CS2101" and "CS2113" and their contents are deleted from the "notes" directory. "CS2101" and "CS2113" will be shown in the first line of the status message, which shows the notes that have been deleted. In the second line of the status message, which shows the entries that are invalid, "ST2334" will be shown. This is because "ST2334" has been previously deleted and should no longer exist in the NSync.+ Timestamp in the status bar is not updated, as this command does not modify the addressBook portion of NSync. -
Test case:
deleteSelectNotes CS ST2334
Expected: No notes are deleted. Error details suggesting for the user to runshowNotesis displayed. Timestamp in the status bar is not updated. This is because only invalid entries are entered. -
Test case:
deleteSelectNotes
Expected: No notes are deleted. Error details are shown in the status message. Timestamp remains unchanged.
-
-
Clearing notes
-
Prerequisites: Before starting NSync, go to the directory the .jar file is in. Create a directory titled "notes". Within the newly created "notes" directory, create 5 separate directories titled "CS2101", "CS2113", "GEQ1000", "GER1000", "ST2334". It is up to the tester if he wants to create documents or subdirectories within any of the newly created 5 directories, in order to simulate actual notes being stored within the directories.
-
Test case:
clearNotes
Expected: All files and directories in the "notes" folder will be cleared. This only excludes hidden bookkeeping files created by the user’s operating system. The resultant "notes" folder will be empty. The status message indicating that your notes have been cleared will be shown. Timestamp in the status bar is not updated, as this command does not modify the addressBook portion of NSync. -
Test case:
clearNotes
Expected: Even though the "notes" folder is empty, clearNotes will still run to ensure that it is indeed empty. Timestamp in the status bar is not updated, as this command does not modify the addressBook portion of NSync.
-
Both deleteAllNotes and clearNotes commands are designed to work with downloadAllNotes and downloadSelectNotes
commands. Using the download commands, notes will be downloaded into the "notes" directory, and automatically, neatly
stored in a subdirectory within the "notes" directory. The name of the subdirectory is the typical module codes of
modules in NUS. This is made possible by the API used for the download notes commands, as well as the module code parser
built into NSync. The result is that all names of subdirectories will be the module code only e.g. "CS2100" and not
"CS2100 Introduction to Computer Organisation".
|
G.4. Download Commands
| The download function has temporarily been disabled in accordance with NUS Information Technology Acceptable use policy for IT resources Ver4.2, Clause 4.6 |
However, if desired, the function can be manually enabled by changing the state of isDownloadDisabled in DownloadAbstract.java.
G.5. ShowNotes Command
Since the download function has been disabled, testers can create a notes folder in the directory of the jar file and fill it with items. The ShowNotes command will display it accordingly
G.6. Changing a person’s time slot
-
Deleting a person while all persons are listed
-
Prerequisites: List all persons using the
listcommand. Multiple persons in the list. Ensure the 1st contact does not have GER1000 at the monday 10am slot of his timetable. -
Test case:
change 1 mon
10am GER1000
Expected: First contact’s monday 10am time slot is changed to GER1000. A messaeg indicating the change has happened successfully is shown. Timestamp in the status bar is updated. -
Test case:
change 0 mon 10am GER1000
Expected: No change happens. Error details shown in the status message. Status bar remains the same. -
Other incorrect delete commands to try:
change 1 ada 10am GER1000,change 1 mon 2321am GER1000,change 1 mon 10am GER1000when the first person’s monday 10am slot already has GER1000. Expected: Invalid Day, Invalid Time, No time slot changed respectively.
-
-
Test case: Delete
addressbook.xml
Expected: Application opens with an address book with the sample data. -
Test case: Corrupt
addressbook.xmlby manually editing it
Expected: Application opens with an address book with empty data.